Understanding a Dress Pattern Part 2

Last week I spoke about how to choose a dress pattern, this week I am going to give you some of my tips on how to read a pattern. As I said last week, Patterns can be intimidating if you have never used one before, but once you know what you are looking at it becomes a whole lot clearer.
Try and think of your pattern as an instruction manual. The information is split up in to different parts to guide you through the process you will need to buy your materials and construct your garment. 

The Pattern Envelope
The front of the envelope will have the picture of all the garments you can make from your pattern, it will also have the pattern number and the sizes that you can make from it.


The back of the envelope is where it can start to look a little scary. There is a lot of information here, some that you need and some that you don't.

It can be more complicated for us here in the UK because most patterns are printed in the USA where they still measure in imperial (inches and yards) and mostly shops in the UK we sell by metric ( metres and centimetres) Don't panic. They will always print the metric amounts on the pattern envelope ( unfortunately on the French side of the pattern ) 

First you need to decide which of the designs within your pattern you are going to make. You can see small drawings on the left which will show you the difference between the styles and give you a letter code for that style, it may be a neck line or a sleeve option or a length option. The image on the front may also give you the letter codes you need to identify the style. Then you can work out the size you need to make, as I mentioned last week, this is important as pattern sizing is not relevant to shop sizing.

Go by your body measurements and make the size that will fit you, you can always take it in a little if it's too big, but if it's too small it wont fit at all.

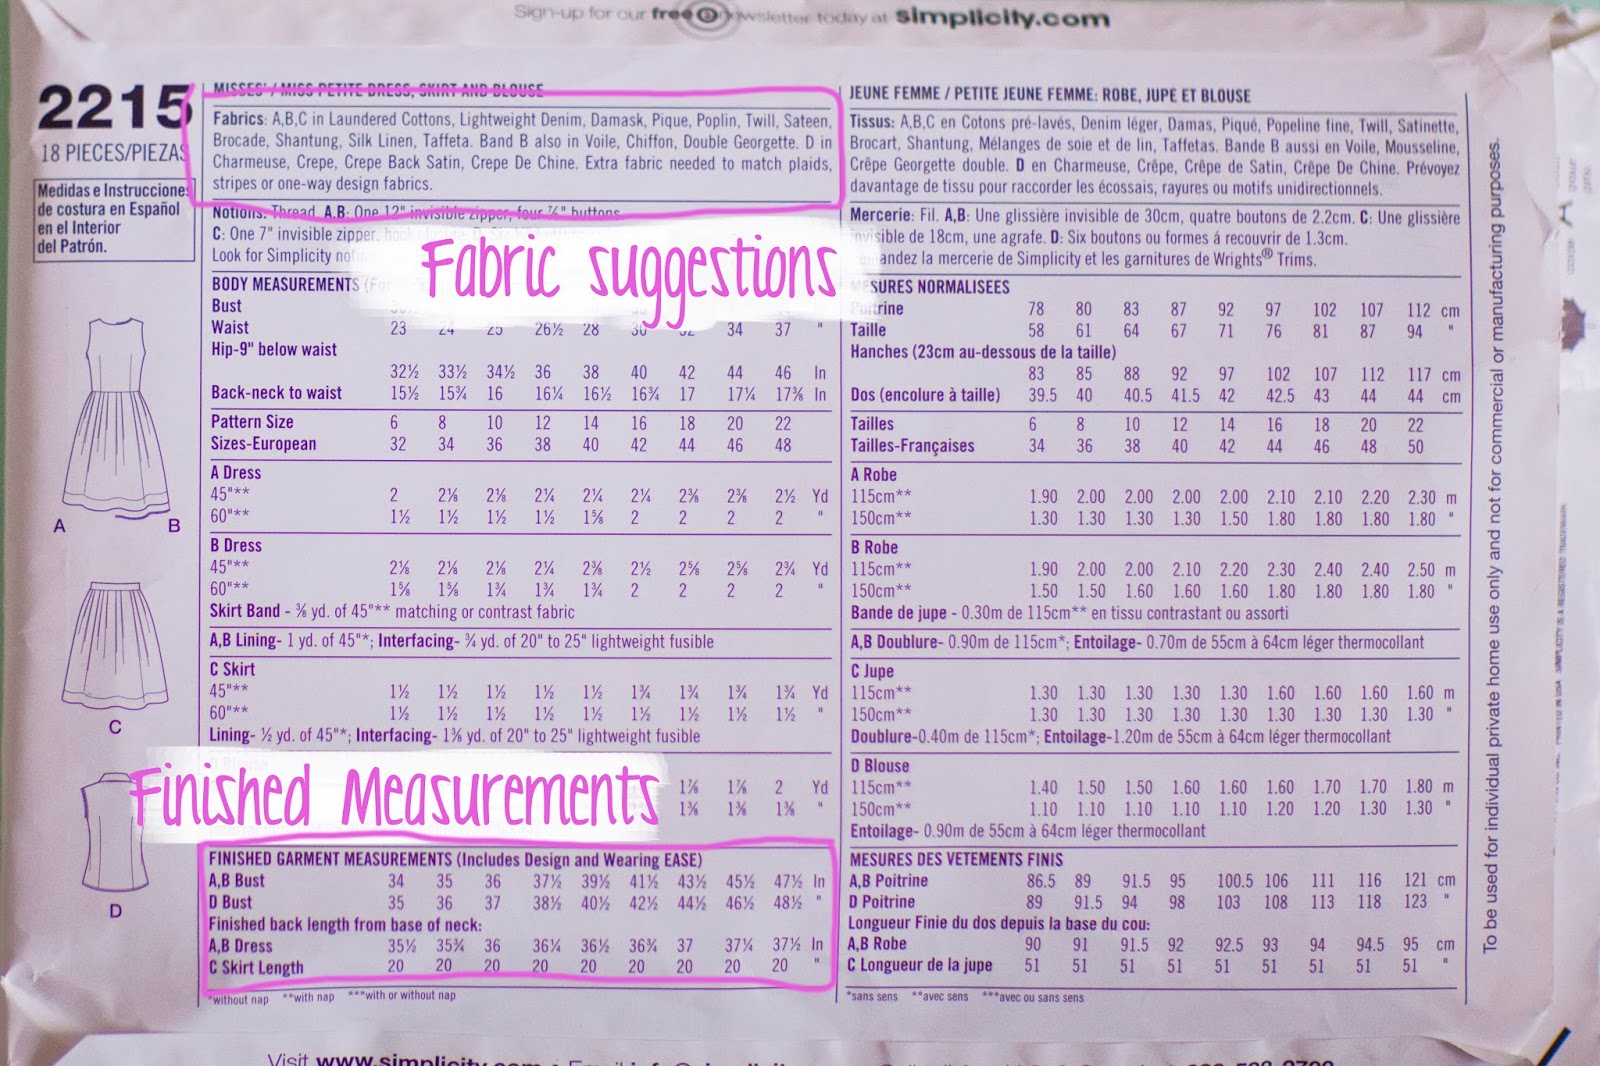
By following down the column under your size you can see how many metres of fabric each design takes. By matching up the letter code for your choice of design with the your size column you can see how much you need to buy. Your pattern may give options for different widths of fabric, usually 115cm (45'') or 150cm (60'') so you will need to check which width your chosen fabric is before you buy so that you get the right amount. once I have bought the pattern I often use a highlighter to mark the column with my size so it is easier to follow in the future.

Also on the back will be a suggested fabrics section where you will find some suggestions for the kinds of fabrics that the pattern is designed for and the Garment measurements, which will give you an idea of the fit of the garment (whether it will be tight or loose and the length)
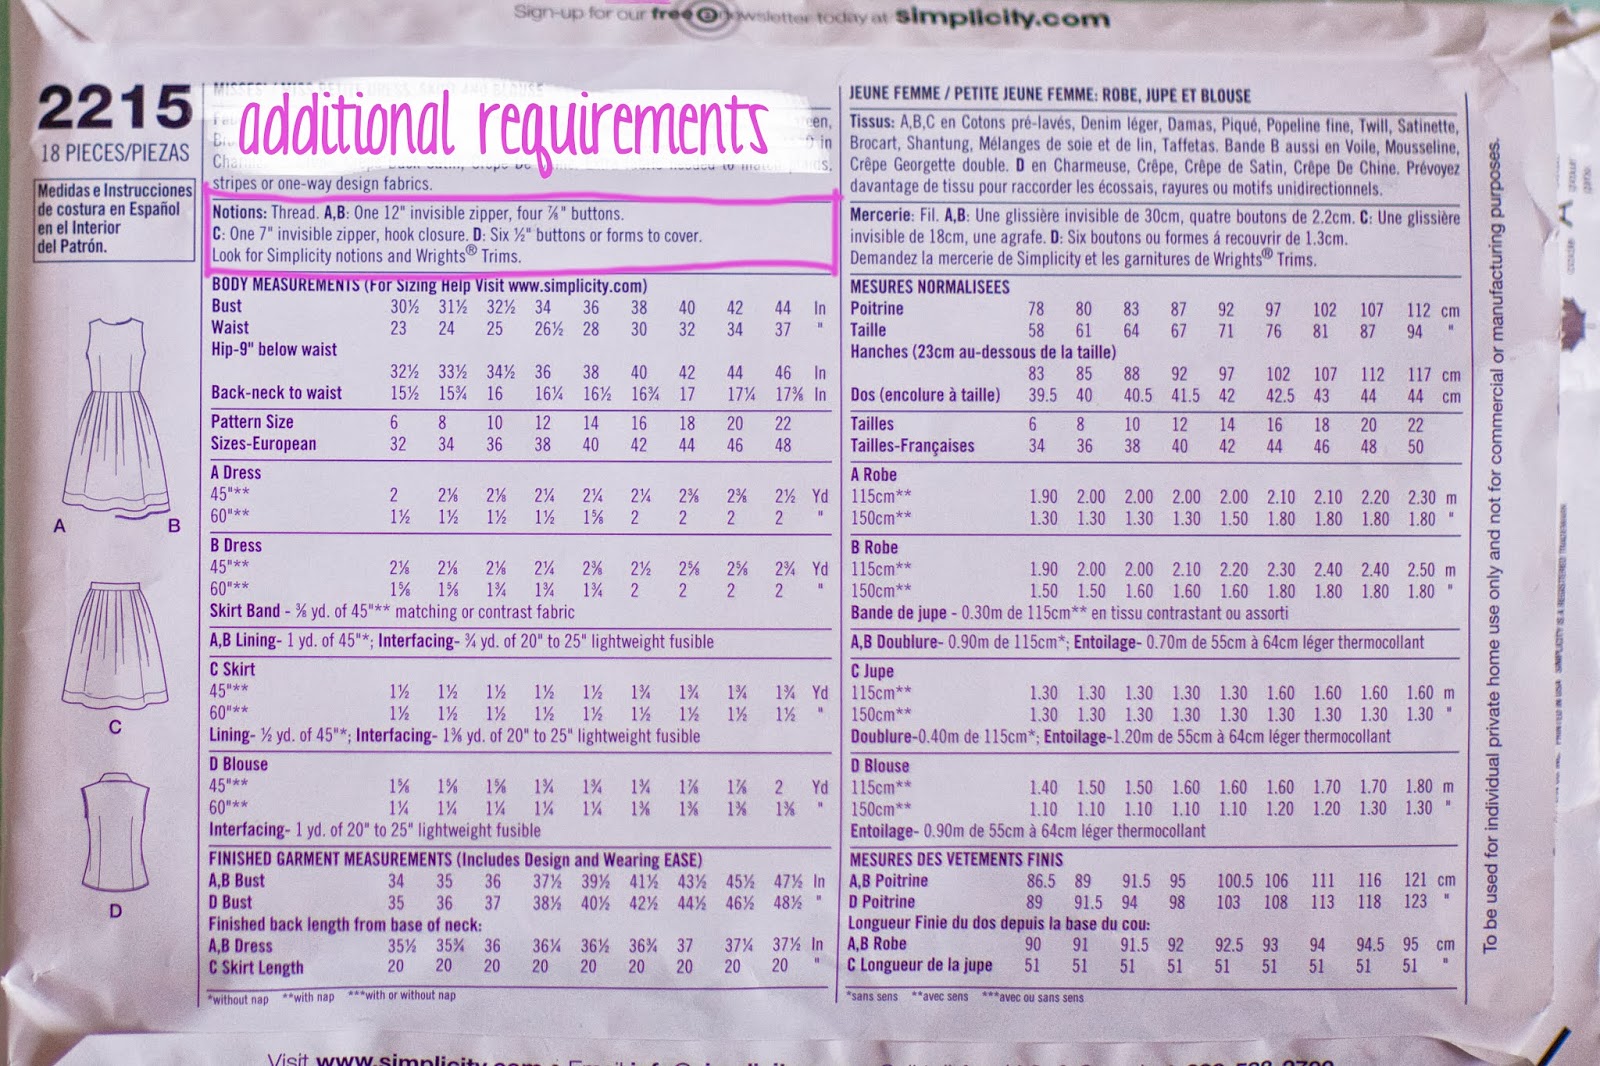
Lastly you will find the requirements section (sometimes called notions) which will tell you what else, other than fabric, you will need to complete the pattern. This is where you will find what size zip, buttons or elastic you need and any additional trims etc.

Usually, if your pattern requires interfacing and occasionally trimmings, they will be listed under the letter listing for each design. 

By following the back of the envelope you should have all the items needed to make your garment.

That's a lot of information to take in so I'm going to leave it there for this week. Next week we will cover the inside the envelope, pattern instructions and the pattern tissue. Check out part 1 here and part 3 here.

Sammy xxx


Make it. Fabric Envelope DIY

You may remember this post I featured in the summer? Well one of the things I want to do this year is get around to making some of these, what I call U.F.O's (Un-finished objects) So here is the first one on my DIY list, fabric envelopes. I thought these would be really cute to send to some of my friends who live a little further away, a nice change from an email or Facebook message and wouldn't they be just perfect for a special Valentine. 

You will need:
a paper envelope, iron on interfacing (vilene), two coordinating fabrics, thread, embroidery thread, a clear cellophane bag, buttons, scissors, a vanishing pen, an iron and if you have one a sewing machine.

You can of course sew these completely by hand, but I have a machine so I am going to use it. 

Start by cutting open the sides of your paper envelope and opening it out flat, we are going to use this as a template. Use your vanishing pen to draw around the template onto your vilene. Iron your vilene onto the fabric you have chosen for the lining of your envelope and cut it out about half a centimetre away from the line you drew to create a small seam allowance. 

Then you can use this to mark out what will be the outside of your envelope again using the vanishing pen, cut around the line you have drawn. Then you will have your two sides ready, you can see the vanishing pen line on the back of the lining which you can use as a sewing guide. Place the two sides of your envelope together and iron the folds in place. This helps with the next stage.

Place your clear plastic piece where you want your address pocket to go and cut it to size. Then with your pen mark the corners on your fabric. Put your lining to one side and stitch your address pocket in place, remember to only sew three sides so you can slide in your label. When that is on, put your fabrics right sides facing and pin them together. 
Sew around all the sides of your envelope leaving a small gap in your stitching so you can turn it through. Before you do trim your seams and cut small notches in any areas that are curved so they will look neat when it's the right side out.  Find the gap you left and carefully turn it through pushing your fingers into any of the points. It should look a little like a flat fish.

Take your iron and smooth it out to the edges, make sure you iron on the lining side so you don't melt your address pocket. Then fold the flaps into place and iron again. Head back to your machine and sew up both sides to create the pocket of the envelope. 
I chose to do a double button fastening by sewing on two buttons, one on the pocket and one on the flap with a length of thread to wrap around to fasten, but you could sew a button hole or pop some Velcro on the closure. All that is left to do is to pop a label in the address pocket and you are ready to fill your envelope with a letter, card or some trinkets to gift to your friends.

The fabric I used for my envelope was from Katherine Codega on Etsy.com, she has some beautiful fabrics and she designs them all herself. Isn't it pretty, I have been waiting to use this piece for ages.

You could make a bunch of these for a bridal shower or as wedding favours, as well as really lovely Valentines gifts.

What would you send in your fabric envelope? and who would you send it too? let us know in the comments. We would love to see if you have a go. With all our DIY's if you do, take a photo and share it with us on Twitter or instagram with the hashtag #livelovemake

Sammy xxx

Don't miss a thing follow us on Bloglovin

Who's Who: Mister Peebles

Our first Who's Who of 2014 is someone that has caught our eye and our hearts, many a time.  Their quirky prints and cards have just that right amount of humour and you may well just recognise Owl Capone further down the page from H's instagram feed!  They have just been stocked in Liberty's too, exciting!!!

Hidden Treasure: Sacred Cafe

Photo courtesy of http://sacredcafe.co.uk
Something which I pride myself on is finding little treasures on my travels and I always have to research a place before I go there - sometimes maps included!  Yes I am THAT person.  I love to find the unusual and the places that other people might not go to, or those places that others recommend.

I thought that I would share some of those places I have found or do find on the way.

I guess, as I lived in London, people are always asking me about places to go and I usually always know a 'little place just up the road from ...' and so its only right that I start with a little place that Sammy and I love to go to when we visit, and it's only a stones throw away from Liberty's, so it can't be bad.

Sacred Cafe brings the New Zealand Cafe experience to London, all I know is that they do a good brew and a lovely slice of cake!  We love to go to the one on Ganton Street off Carnaby Street, but there are also venues at Westfield White City, Covent Garden and Highbury.  They have a wide range of Teapots and plates so that no one gets the same.  So many different types of tea too and the cake slices are a good wedge rather than a sliver - nothing beats that!

It makes a great excuse for a bit of a sit down after some Oxford Street shopping or just a place to relax before you start.  There are so many places to have a drink around Oxford Street but you can't beat an independent cafe to get your coffee fix.

If you have been or you go and try it out, do let us know in the comments below, we would love to know what you think!

H

Understanding a Dress Pattern Part 1

Dress making patterns can be intimidating if you have never worked with them before. There is a lot of information on the outside and inside of a pattern envelope that needs to be taken into consideration and is essential to knowing whether the pattern will work for you. We sell lots of patterns everyday in Sew Crafty, and I have been working with patterns since I was little so I thought I would share some of the tips I have learned over the years to help you understand how they work and how to choose the one that is right for you. (Please bear in mind that some of the sizing information is relevant to the UK only)

The Basics
Searching for your pattern : You can search either in store via catalogues or online via the pattern company websites. I prefer to use the catalogues as you can gain more information from them and I find it easier to compare patterns to one another if I can see the actual product. Most stores that sell patterns have a variety of books to choose from, for instance at Sew Crafty we have New Look, Simplicity and McCalls patterns in stock and have Vogue and Butterick catalogues with the patterns to order. Usually you will search through the catalogues to find the design you like, then the sales assistant will find the pattern envelope in the stock drawers for you in the size that you need. 

Sizing : Check that the pattern is available in your size. We find that patterns come up at least one size smaller than you would buy in say Marks and Spencer's or Topshop. You can check your measurements for sizing in the back of the catalogues for a general guide, and specific sizing on the pattern itself. A good general rule to follow is that if you usually buy a size 12 in a ready made garment you will be best making a size 14 in a pattern. Luckily most patterns come in multi sized groupings, for instance (8-14) - (14-24) so you can be a little flexible. Be aware that the back of the pattern envelope will give you details for all the sizes, only the front will tell you the grouping you are buying. 

Measurements : The other thing that can be helpful when looking at size is taking your measurements before you go to look for patterns. Knowing your measurements in inches and cm is helpful when trying to choose a pattern. The garment measurements and size measurements are usually listed on the back of the pattern envelope (if not they will be on the instructions) and will give you a good indication of the size and length of the finished garment. This will let you know what the fit of the garment is like too, whether it is designed to be a tight  fit, or a loose baggy garment, how full the skirt will be etc.

Fabric : If you want a pattern to make a cotton dress, picking a design that is shown in thick wool is not going to work very well. Try and be guided by the fabric suggestions on the pattern envelope.

Style : When shopping for clothes we try and choose styles that suit our figures, do the same with patterns. You will never get a good result if you pick a style that is not what you would usually wear. 

Over ambitious : Try to pick a pattern that is relevant to your experience. If you choose a pattern that has lots of pieces and detailed seams, as a beginner, it can be too complicated and will end up being frustrating. Work your way up to details like pin tucks, detailed seams, intricate collars and sleeves. If you learn a different technique every time you try a pattern you will get a better result than trying to learn everything at once.

Catalogue drawings : Don't let the drawings or photographs in the catalogues put you off. I try to look at the small line drawings at the bottom of each page to get an idea of shape, rather than being put off by a fabric choice or an exaggerated illustration. 

This is Part 1 of 3 the next section which will explain more about the pattern envelope and what all that information is for. Parts two and three are now available to view, Part 2 here and Part 3 here.

Sammy xxx 

If you liked this post and like our blog, please pop over and vote for us in this years blog awards.
To keep up with all our latest posts follow us on Bloglovin

Cosy January Fashion Favourites Wishlist

1. Sports Direct snow boots, 2. Divergent by Veronica Roth. 3. Dorothy Perkins Sparkle socks, 4. New Look Kimono cardigan, 5. Forever21 Plus Aztec hoodie, 6. New Look Grey tote bag, 7. Forever 21 Bib necklace.

I don't know about you but I am so busy in December that I never find time for reading, so January is my month for sitting cosied up in bed and getting thorough a couple of books on my Kindle. I actually got a paperback copy of Divergent for Christmas, so I am looking forward to getting stuck into a real book for a change. Wrapping up warm is a must here in the UK, Snow is on it's way and I want to be ready. I am in love with these Sports Direct bargain versions of this winters 'it boot' from Sorel and the Aztec hoodie from Forever 21 +. I am so excited that they are now doing a plus size range! Another favourite for January is this statement necklace also from Forever 21, it would bring a splash of warmth to any winter outfit, They have a great range of statement necklaces.

How do you like to stay cosy and warm in these non-festive winter months?

Sammy xxx