Have a Great Christmas!


We wanted to pop a little note on the blog to wish you all a very Merry Christmas and Happy New Year!

We will be taking a small break over Christmas, but will be back before you know it at the beginning of 2016!  Whoop. 

We have had a great time this year with lots of tutorials, fun times and food.  Long may it continue.  We are so very happy that you guys come along for the ride and we are planning bigger and better things in the New Year, so keep an eye out.

Enjoy some rest, lots of food and plenty of time with those you love, and we will see you on the other side!

Much love
H & Sammy, xxx
 

Bloglovin / Twitter / Facebook / Pinterest / Google+ / Instagram

Make it: Ipad/Cookbook holder

I found this tutorial on A Bubbly Life's blog and so thought with my leftover copper after the candle holder tutorial, I would give it a go.  I love the idea of using this in your kitchen to cook up a storm either by using a handy You tube clip from Sorted food or getting out your cookbook from the cupboard to give a new recipe a go this Christmas.  It's such a simple thing to make too, only took about 20 minutes, so perfect for a last minute gift idea.

Let's meet yearly roundup


It's coming to the end of the year and not only that but it's the last few online shopping days to get items in time for Christmas and so we thought that not only would we do a round-up of all our great "Let's Meet" interviews this year, but also it might help with those last minute present ideas.

Well, it is Christmas, so ...


I think this image says it all hey.  I think sometimes we get bogged down with the expectation and this time of year brings up people we miss, things we feel are not going right and also that we should be happy all of the time - no one is Mary Poppins.  But you know what it's ok to do what you want whether that be go all out and spend everything, or stay at home and eat a can of soup.

Just enjoy it.

Thought I would keep it short and sweet today as we have had so much to keep you going on the blog, more to come too.

H,xxx

Bloglovin / Twitter / Facebook / Pinterest / Google+ / Instagram

Monogram Gifts

Letter tags  /  Letter stamp  /  Letter stocking  /  Floral letter  /  Marquee letter  /  Letter pouch     Letter print  /  Letter tag  /  Letter make-up bag  /  letter notes  /  Letter Stocking (DIY)  /  Letter Card

Nothing says 'I bought this just for you' like a gift embellished with the recipients initial. Monograms are a great way to make a gift really personal. These are my pick of the best options around this Christmas. Of course I had to slip in cheeky DIY in there, but adding an initial to an existing gift is also easy to do with a tag or a motif.

How are you getting on with your Christmas gift buying? Are you all done and wrapped or are you just beginning? I'm looking forward to finishing mine off this week, then the wrapping will commence!

Have a great weekend
Sammy xxx


Bloglovin / Twitter / Facebook / Pinterest / Google+ / Instagram

Make it: Copper Candle Holder

This year is all about Copper as we must all know by now and so I thought what better way to make a gift for someone this Christmas.  I was kindly sent a gift voucher from the guys at B&Q and there will be a few more treats to come, but I thought this was a good place to start!  What better way to get the table decorated this Christmas than with a candle holder for your centrepiece, or just to make as a present for a copper loving friend who is into the industrial look.


You will need: 15mm Copper Pipe, cut into 1 x 18cm, 1 x 13cm, 2 x 11cm, 4 x 4cm, 4 x 2cm.  2 x 15mm equal tee, 8 x 15mm elbow (I only have 4 in the picture, oops), 2 x 22mm x 3/4" female straight top connector, Glue (I used Gorilla Glue), Pipe cutter, pen, ruler, candles.

Firstly you will need to cut up all your bits of pipe.  I used a pen to mark the measurements of length I wanted and cut them all first to make sure I had everything.

Step 1: Glue 2 of your 4cm pieces into either side of the equal tee - do this for both equal tee's.

Step 2: Glue your elbow pieces into one end of the 11cm pieces and then the equal tee sections, making a square shape.  You will need to make sure your equal tee open section is upwards and straight so that what you connect into it points upwards.  You can of course make your measurements for this square base larger or smaller depending on your desired size.

Step 3: Glue one of your candle lengths to a elbow and then one of the 2cm pieces on the other end, before adding another elbow and 2cm piece to make a bend in the pipe.  You can now glue on what will be the candle holder, the straight top connector.  You can always get these without the nuts or take them off, but I decided to leave mine on.

Step 4: The last thing to do is glue in both of your tall lengths into the equal tee that is pointing upwards and you are done.


This is quite a simple version, you could of course add more equal tee's and make the whole thing larger to introduce more candles.  Perhaps some straight holders and some smaller ones, so that it had a large candelabra effect for decoration.


I like the simplicity of this one as I have just the perfect person to give it to.  It would look great with other candle holders and decorations too for all other times of year.


How would you make yours?  If you make one, don't forget to send us a picture and #livelovemake on Instagram or twitter so that we can see what you make.

H,xxx

Please note: The materials were bought with a B&Q gift voucher but they did not recommend products or have any influence on what I made with it. Thank you B&Q!

Bloglovin / Twitter / Facebook / Pinterest / Google+ / Instagram

Christmas Food Round-up

It's nearly here, fill your face with food Christmas time!  I thought a few little treats to keep me on the dairy free straight and narrow would be good to take a look at and of course get me drooling a little bit early!

First up, this perfect roast chicken from Elena's Pantry, lets face it most roast chicken is dairy free, but I am yet to get my roast chicken quite right, so looking up a recipe is always good for me.

Next, these amazing looking sticky roasted parsnips from BBC good food would be the perfect accompaniment with the chicken and some roast potatoes and stuffing of course!

Add a bit of bread like this one from the Pure Dairy free website and you can mop up all that gravy left over.  yum. Seriously I am drooling here just writing this!

Then, the most difficult of projects to get dairy free, the pudding!  I am not a fan of Christmas cake or Christmas Pudding or even Mince pies, but I do love a Chocolate Yule Log!  My mum made this amazing one with Coconut cream last year - hoping for that again if your reading mum.  But this one from Lachie's Allergy Cookbook looks great too.

I definitely need to go and get some lunch now.

What's on your Christmas food list this year, any new food for the table?  Let us know in the comments below and maybe we can add them to our table this year too.

H, xxx

Bloglovin / Twitter / Facebook / Pinterest / Google+ / Instagram

Make it: Kate Spade Inspired Glitter Accessories

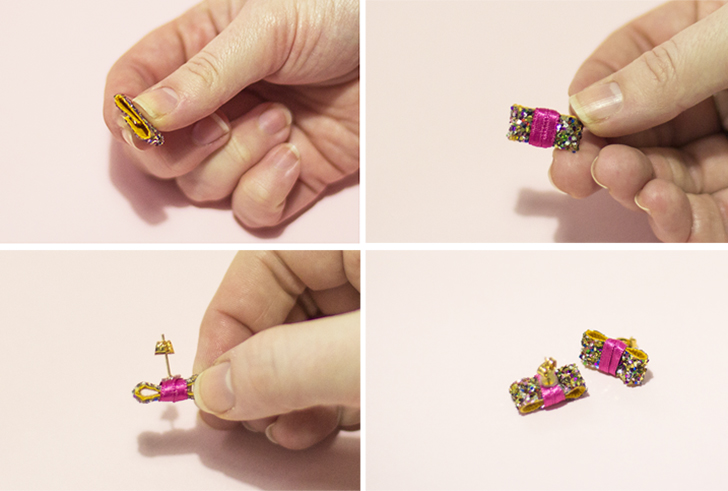
It is without doubt the time of year to add some sparkle to your accessories.  Today I have three simple DIY's that are inspired by one of my favourite designers Kate Spade.  Not only are they are so simple and look amazing but they are also budget friendly.  One A4 sheet of glitter fabric is more than enough to make all three accessories,  I am going to show you how to make simple shoe bows, earnings and a statement clutch bag.  I have used an old clutch bag but you could easily make a simple zip-topped pouch using our make-up bag tutorial. 

You will need: Glitter fabric, shoe clips, earring backs, pink ribbon 3mm and 15mm wide, a black clutch bag, glue, chalk pencil, a scrap of felt and scissors. 

For the shoe clips:
Step 1. Cut two strips of glitter fabric approximately 3.5cm wide by 25cm and fold the two short ends into the centre and glue them in place.
Step 2. Take a short length of 15mm pink ribbon and wrap it around the centre of the glitter bow. 
Step 3. Glue a shoe clip in place on the back, to the bow at the top.
Step 4. To make it more secure glue a small piece of felt over the top of the clip. 


These bows are so simple to make and they would make really cute brooches too, or you could attach them to gifts to make your Christmas wrapping look extra special.


For the bow earrings:
Step 1. As with the shoe clips you want to cut two strips of glitter fabric approx 4.5cm long by 1cm wide. Fold the edges to the middle and glue them in place. 
Step 2. Wrap a small length of 3mm ribbon twice around the centre of the glitter bow and glue the ends. 
Step 3. Glue a small earring post (or clip) to the centre back of each bow. 


For the statement clutch bag:
Step 1. Decide what word or phrase you want to have on your bag, then using a chalk pencil mark out the letters you need on the reverse of the fabric with a chalk pencil. Remember to flip the letters so they are the right way round when you turn the fabric back over. 
Step 2. Cut out each letter.
Step 3. Glue the letters to your clutch bag.


And that's it, a simple and fun way to sparkle up any outfit this holiday season especially if you are on a budget, as the supplies for all of these DIY's cost under £10. 

What holiday parties are you going to this year? Are you throwing a holiday party? If not don't worry because these would also make great gifts for your party animal friends! Don't forget to #livelovemake to show us your DIY's from our blog, 

Sammy xxx


Bloglovin / Twitter / Facebook / Pinterest / Google+ / Instagram

Check this out: Art inspiration at Tate Modern

Last week I went for a cheeky trip to Tate Modern when I was in London.  As you know, I work in a Museum and Art Gallery and so sometimes going to see more Art can get put on the back burner.  But when I do go, I realise how much I miss it.

I love seeing what other museums have and being able to be anonymous within the artworks.  There was a new hang of the main collection to see this time called Making Traces, which I loved.

I am a fan of Abstract art and I know that it is not to everyone's taste, but I could sit and look at some of the pictures for hours.  I like to sit and look and see what I can see within the picture.  It might not be something realistic, but seeing the colours, lines and shapes made really resonates with me.

A few of my favourites are above in the pictures, which are referenced below.

Top left - Avis Newman - The Wing of the Wind of Madness 1982
Top right - Gerhard Richter - Cage (1) - (6) 2006
Bottom left - Jacqueline Humphries - Untitled 2014
Bottom right - Sam Francis - Around the Blues 1957/62

I particular liked the Ritcher Cage paintings as it was a room of similar pictures, with different colours.  If there had of been seating in the room, I would have sat for hours in there.

I am a big fan of abstract paintings particularly and whenever I see it, I just want to get a studio somewhere and paint.  Make a mess, get paint all over the floor and myself and feel the texture of paint in my fingers.  Maybe it comes from being little and wanting to feel the paint on your hands.  I see it all the time with the children we see at the museum, paint everywhere, eating it, paint in there fingers and in their hair!  Just how paint should be enjoyed.

It may be a little early for resolutions around here, but I want to make more time for inspiration trips like this next year and for doing creative stuff, for well, just because.  Maybe I will start one of those sketchbook ideas, where I do something experimental and fun in a sketchbook just to see what comes.

What gets you inspired?  Do you have a favourite place to remind yourself of what you love?

H, xxx

Bloglovin / Twitter / Facebook / Pinterest / Google+ / Instagram

Top Ten Handmade Gifts to Buy


Last week we were all about the DIY gifts and I know that as much as we love the thought of being able to make a little something for everyone, it won't always work out that way. However that doesn't mean that you can't do your bit and support other makers out there.  I have rounded up our top ten handmade gifts to buy all from UK based designer makers, all of which your loved ones will be over the moon with come Christmas day.

Crochet Unicorn for your Niece by Kornflake Stew

Beautiful Chocolate Cookies for your Mum from the Whimsical Cake Company


Small Soy Candles for your Mates from East Wick


Dagger Necklace for your Sister from Promises Promises

Egg pot and shovel for your Brother from Lahla Studio

Here, Bear and everywhere calendar for your Dad from Mister Peebles

Ceramic hanging planter for your Nana from Kabin

Monogram Scarf for your Other Half from Warm Pixie Diy

Custard Cream purse for your Best Mate from Nikki McWilliams

Pet Tipi for the Fur Babies from PupTart

So that should be everything done and dusted gift wise, now you can sit back and enjoy the countdown to Christmas. If you have the perfect handmade gift that we haven't included in our list please link it up in the comments below or on post a pic on Instagram and link us @liveit.loveit.makeit in the comments with who you would gift it to!

Sammy xxx


Bloglovin / Twitter / Facebook / Pinterest / Google+ / Instagram

Why We Will be Shopping Independent this Christmas


I feel that we might be hammering in the point at the moment about shopping independent, buying handmade and making this Christmas, but we are not going to stop any time soon!  You might have seen via our Instagram that we have been enjoying all the craft fairs in London these past few weeks, first up was Renegade at the beginning of the month and Sunday, just gone, was Bust Craftacular.

We do love a craft fair as I am sure you will know by now.  But what we really love about them is discovering the people behind the brands who are always so lovely and the individual nature of the work. The best part is that you know all of the money you spend goes towards that designer/maker making more and learning more and experimenting more.  Basically your paying for them to grow, it's not all about factories, profits and margins.

You may have seen the 'Just a Card' campaign, which aims to improve the fortunes of independent businesses and makers, as, if everyone bought just a card, then it could make a real difference to those people who make them.  Cards are so easy to buy and the easy option at a craft fair, so why not aim to start buying handmade rather than production line cards, it could be your 2016 resolution if you don't want to start this Christmas of course!

We thought we should take this time to mention a few new (to us) designer/makers we found at this years fairs.  First up was at Renegade and we loved Monti by Monti with these ace terrariums, Verdantica who 'create bespoke miniature worlds' and Sparrow + Wolf whose cushions Sammy just had to have!

Bust Craftacular was an altogether more colourful set of new (to us) finds, as you can see.  These badge rosettes from dAKOTArAEdUST were super fun and so bright,  then the cute face mitts (do you remember them from being a child!) from Terri Leahy and lastly were these cool patterned trays from Jonna Saarinen. We picked up some awesome gift ideas from both fairs for Christmas and beyond.
 
Another thing we are really enjoying about modern craft fairs at the moment is that they are introducing more workshops as well as stalls into the experience. We took part in a workshop by the lovely Helen Robinson at Bust Craftacular to make Macramé plant holders!  I feel a new craft addiction coming on for both of us, watch out for more of this.  Going back to the 70's is a big trend at the moment and so Macramé was always going to make a comeback!

Another reason we love independent makers, is that they inspire us to try new things, learn more ourselves and have even more beautiful things in our lives!  We just want all the pretty around us all the time!

Are you going to shop independent this Christmas?  Or make your own, have you been inspired to try your hand at something yourself?  Do check out our tutorials in the 'Make it' tab above to give you some inspiration.  Also check out Sammy's post last week and this Friday for a few more handmade gift ideas.

H, xxx

Bloglovin / Twitter / Facebook / Pinterest / Google+ / Instagram

Make it: Star Wars baubles

Last year you may have seen my Teenage Mutant Ninja Turtle baubles and so this year I had to go better! I am sensing a yearly tradition coming on here!  With the new Star Wars movie coming out, I thought this years theme should be that, please don't hate me hardcore Star Wars fans!  I grew up with the original Star Wars and so am a fan, I just hope I have done R2D2 and BB8 justice.

You will need: White Baubles (mine were from B&Q), Sharpies in red, blue, black and orange (mine ran out so I used a highlighter), Silver pen, pencil if you want to draw first.

For R2D2, choose one of your baubles, I went for the matt type as its easier to draw on.  Draw a line with your silver pen halfway down the bauble, all the way around.

Fill in the top part of the bauble with the silver, you could also use silver paint if you prefer.

Just above the halfway point, draw a blue line all the way around the bauble.

At the top, where the hanger is, draw segments out of the centre with the blue pen.

Time to start adding details.  I started with the larger buttons at the front.

Then added in further detail all the way around the bauble including buttons and where R2D2's blue metal areas sit.  You can find a picture online to help you.

Then when I was finished with the top part, I added in sections on the bottom until R2D2 was finished.


Then I thought to make a matching pair, I should make the BB8 robot from the new movies.  So using all the same materials from above, I found a picture and got started.

First I started with the top Orange loop around the top using the highlighter - I would have used an orange Sharpie but mine had run out just as I was starting this project!

Then onto the silver loop at the top using my trusty silver pen.

Camera and buttons came next using the Black and a little red for a light showing through.

Then onto the bottom silver circle, it is hard to get this straight so you could always use pencil first.

I did a small bit of outlining on the silver parts and added some more buttons, but I did keep it pretty simple.

Finally, I added some more orange for buttons around the bottom, which went all the way around the bauble.

Then, another one done!

I think they both look great next to each other and are going to make my tree very nostalgic this year, with my Ninja Turtles from last year.

I haven't got my tree up yet and so my Succulent Groot gave me a helping hand with hanging the baubles.  I could have gone one step further and made C3PO, maybe another project for the weekend!  I am so loving these baubles, I am definitely going to have to up my game again next year I think!

If you have a go at this project or even last years Ninja Turtles, then please do send us a picture on Twitter or Instagram using #livelovemake, we would love to see them.

H,xxx

Bloglovin / Twitter / Facebook / Pinterest / Google+ / Instagram