July Favourites

Monthly favourites time again! July has been very different for me as I have actually had some time away with no internet or phone reception  -  it was not fun for me. Lessons learnt that I am not good with un-voluntary internet withdrawal. It did mean that I had a chance to read a couple of books which appear here so I suppose I can't complain really.

I am so late to the party with this one but if you haven't yet picked up a copy of #GIRLBOSS do it now! If you are a small business owner or not, if you like sassy girls who have done well for themselves,s then this book is for you.

Accessorize new nail polish range, particularly the packaging, Totally in love with these little potion bottles with rose gold lids. Pixi glow tonic is also a new fave, it has improved my skin so much over the last month.

I have owned a Filofax for years, mostly using it as an address book. It wasn't until I discovered the intense planner community online earlier this year that I looked again at my trusty six ring binder. The fact that I can combine my love of paper crafts and keep a better track of all the crazy parts of my life is a winning combination for me. I have a Mint A5 Domino for my diary and daily to do's and an original lilac A5 for projects and notes.

MrKate.com is my new Youtube /blog obsession! I love this trendy/kooky DIY fashionista. Who wouldn't! She and her team make great DIY, interiors and fashion videos. This girl boss also has her own jewellery line and a range of temporary tatts that are to die for. #newgirlcrush

I am in a DIY frenzy over here, getting lots of projects off my desk to make way for some big announcements from Sew Crafty over the next few months, keep your eyes peeled you will hear all the news here first. Hope you all have a lovely weekend.

Don't forget to tell us your favourites in the comments below.

Sammy xxx


Bloglovin / Twitter / Facebook / Pinterest / Google+ / Instagram

Mythbusting: Photography

It is time again for another Myth busting post, and we thought it was about time that we covered a topic that we get asked a lot about, Photography.

Quill London Beginners Calligraphy

Last weekend, I popped along to the Quill London Beginners Calligraphy class over in Islington in a side room to The Blacksmith & Toffeemakers pub (which  by the way is very lovely).

I have never done any calligraphy before and so it was a great afternoon to try my hand at something really different.  Our teacher was Imogen Owen for this class and Quill London founder Lucy was there to start us off and let us know where the cake was!  Very Important to keep us going.

Imogen, started us off by showing us each step before we then went off and practiced back at our tables.

The First practice was to learn the up and down lines and practice shape and some lettering.  We were given ruled paper to put under our paper to keep us straight too.

Next up was to practice lettering, we were able to trace over Imogen's practice sheet first and then do our own on other sheets, following the style.

The last task was to practice writing words and joining up those letters.  I found this part difficult as I was working with someone else's handwriting style.  I think a bit more practice with the calligraphy pen in my own style is in order, but that's the great thing about learning a new skill hey, practice makes perfect.

H,xxx

Bloglovin / Twitter / Facebook / Pinterest / Google+ / Instagram

Make it: Fabric Storage Bin with Zazzle


If you saw our post on Wednesday about designing fabric with the lovely guys at Zazzle you will know haw much we are loving the site, so today I am showing you what I made with the fabric I designed. When I saw that Zazzle.co.uk offered a heavier weight twill fabric in their 'design your own fabric' range I knew exactly what I wanted to make. I had my design printed on the heavier weight fabric so I could have a go at making some cute fabric storage bins.

To make your own fabric storage bins you will need: Medium to heavy weight cotton fabric, felt, cotton to line your bin, thread, scissors and a sewing machine. 
As I always say you can of course sew this project by hand if you don't have a machine. 

Step 1. Cut out a 20cm square of all your fabrics to use as your base, then cut an 80cm by 25cm piece for the strip that will make the sides. Place the felt at the bottom, the lining next then the main fabric on top and sew around the edges leaving a small gap to turn it right side out. 

Step 2. Do this for the base and the side strip, sewing up the gap that you used to turn it through. 

Step 3. With right sides together sew the two short edges together with a large zigzag stitch.

Step 4-5-6. Open out your tube that will be the sides of the bin and position the back seam to the back of the bin, using quilting clips attach the bottom of the bin to the sides. 

Step 7. Stitch all the way around the base removing the clips as you go with that large zigzag stitch as before. 

Step 8. Turn the whole bin right side out and turn down the lip to create a more stable top.


And there you have it, a cute little storage bin for sewing supplies, stationery or well whatever you like really. I am using mine on my sewing table as a handy catch all for my fabric scraps, so much more glam than the plastic bag I was using before! 

Check back to see what H has made with her fabric in the next few weeks. Don't forget to share your photos if you have a go at making some of these with #livelovemake we would love to see your versions and what you use them for! 

Have a lovely crafty weekend
Sammy xxx


Bloglovin / Twitter / Facebook / Pinterest / Google+ / Instagram

Design your own Fabric with Zazzle

A few weeks ago the lovely people at Zazzle got in touch to tell us about their fabric printing service. Having recently said farewell to the fabric printing service from By Hand London, Sammy was so excited to have a try and see what Zazzle had to offer. They offered us a free sample of the fabric to have a play with so watch out for a tutorial coming on Friday using the fabric Sammy ordered. Sammy has bought t-shirts and merchandise from them in the past so she knew that their quality was great, but we were not sure how simple it would be to design our own fabric with Zazzle or how it would turn out.  

We both started by having some fun in Photoshop and created a .jpg file that we could upload to the site, this is Sammy's above.  H had fun with the background eraser tool on Photoshop so she could use one of the colours from Zazzle - more on that below.

Once on the Zazzle site it was then super easy to upload the image we had designed into their fabric creator.  H used one of the background colours on file, whilst Sammy's was all together on the .jpg file.

Then you get to play around with tiling the pattern, rotating your design and playing with the size of your print.  You can use the tiling options or not, so that's always good for choice.


We love that you can view your design in lots of different sizes, it loads the images with your design on really fast so it is easy to get a real idea of what your fabric will really look like with the handy thumbnails underneath the main picture.


There are seven different types of fabric to choose from, but don't get too excited, some of them are priced at over £60 per metre, which we feel is a little pricey, even for high quality custom printed fabric. The combed cotton is the cheapest option at £26.95 per metre, The pima cotton that H chose was £30.40 per metre and the cotton twill Sammy chose was £37.90 per metre. You can order by the fat quarter though which would keep the cost down for smaller projects. 

When our fabric arrived we were really happy with the quality of the fabric and the quality of the printing on H's fabric was beautiful as the colours were very true to her design. Sammy's fabric on the other hand was sadly not so perfect.

She was a little disappointed because the fabric looked like it had been double printed, it makes the design look a little blurred. She would have been more disappointed if we had paid the £37.90 that it would normally cost. 

When Sammy spoke to the team they said that they would absolutely replace the fabric, if we wanted, as it was gifted to us anyway, She decided that it would be fine for the project that she had planned. Good to know that if there was a problem as a paying customer that they would go the extra mile to sort it out. 

The Zazzle team said:
We have a 100% satisfaction policy at Zazzle, so if a product is unsatisfactory, and the customer provides a photo like you did here, they would be offered a replacement or refund. Customer can call our freephone number 0800-6-929953 10am-6pm Monday to Friday or email us here http://www.zazzle.co.uk/about/contactus.

So overall we would highly recommend Zazzle if you had a special project in mind that you need some bespoke fabric for. We would say that the price makes it a little risky if your not 100% sure you are going to use it for something really worthy of it. 

It was unfortunate that Sammy's fabric wasn't perfect, even big companies make mistakes sometimes but at least they offered to sort it out properly. Everything about the process was easy and fun. Sammy love's designing fabrics and she is looking forward to having a go again soon as she already have a few deisigns and projects in mind.

Have you tried the fabric service from Zazzle? Are you looking to get some fabric printed for a special project? Let us know in the comments below and don't forget to come back to see what Sammy has made with her fabric on Friday.

Sammy & H, xxx


Bloglovin / Twitter / Facebook / Pinterest / Google+ / Instagram


Love it: H's RA Summer Exhibition Adventure

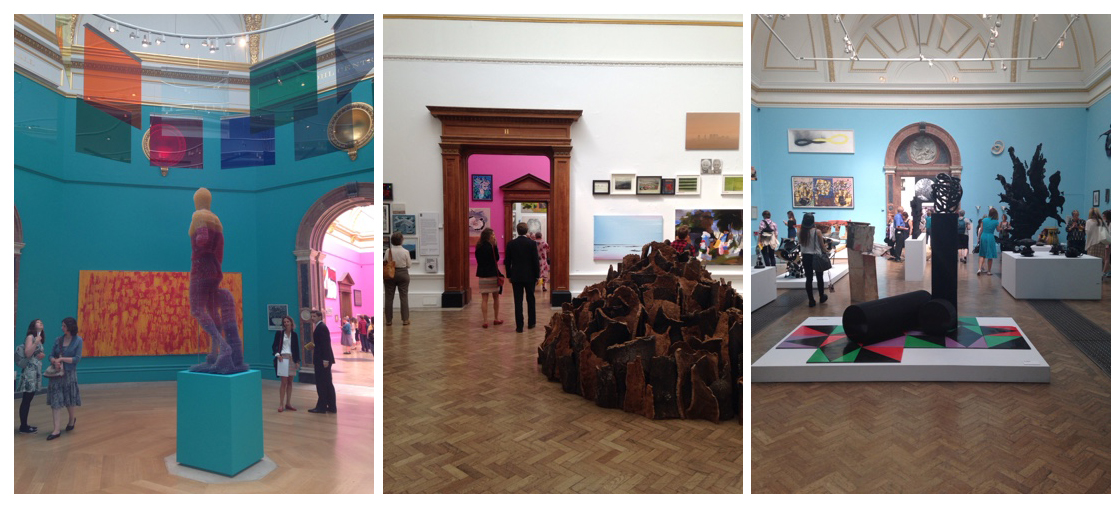
I love a good gallery visit and you may have noticed (if you are a long time reader) that I love going to the Royal Academy Summer Exhibition every year.  Last year I was not that impressed as it was starting to feel a bit samey, but this year, thanks in part to an injection of colour from Michael Craig-Martin, they have upped their game!

Also, due to being able to take photos in the gallery spaces, I can share all the joy with you guys.  You have never been able to take photographs before and they are now asking you to share, so that's another plus from me!

If you have never been to the Summer show, it is an exhibition made up from artworks that come from well known artists right thru to people who submit the work they do on their kitchen table.  Every year there is an artist who takes on the overall curator role, keeping all the other artist rooms in check.  This is what makes it so special and so different.  So lets take a look at what I saw.


The gallery spaces at the RA flit between the small to the large and so there is always going to be a different hang in each room.  This year Michael Craig-Martin had painted some of the walls in these vibrant colours, which many would think compete with the artwork on display, but I love!  I think it makes the artwork look great and gives a totally different feel to the gallery spaces.

I love the way some of the artwork is hung, it is never uniform and always interesting, I do wonder how they get away with hanging some pieces quite so high, as I know we couldn't at the place I work.  A good example is the way in which the pictures are hung in the middle picture above.


These are some of my favourite artists, from Fiona Rae on the left who I have loved for a long time and a new love from Frank Bowling to this Rainfall stunner from Ermioni Avramidou which is Acrylic ink on paper.  It really looks like it is wet.  I could sit and look at these for hours.  I find it fascinating to see what people love and hate in galleries, it's all about individual taste after all.

 The architecture room is always one of my favourite's.  One of my favourite things to do when I was at uni is make models and so this may be why.  I loved this colourful model, only annoyed as I didn't manage to get who it was by.  This sculpture by Tim Shaw is huge and considering it is actually made from painted foam, polythene and steel - it looks very like a bronze sculpture close up.  I couldn't do a post about the RA show without showing the stairs!  Truly the best way to enter and leave the building!


I couldn't resist showing a few more of my favourites of the show and all by new artists - to me.  Which is another great reason I love going to the show every year, finding new artists I like.  I love how this piece by Gordon Cheung is hung with all the other smaller ones around it and the mysterious nature of the painting is great too.  This large moon quickly got my attention and Jock McFadyen has done a brilliant job of pulling you into the picture.  Lastly but by no means least was the X room which was dedicated to Tom Phillips, A Humument, this was one of my favourite pages.


Talking of Tom, here is a little more about the piece.  There was a whole book, individually drawn on pages that had been worked and reworked by the artist.  You can find out more about the piece here.


So all in all, I think you could say that I really enjoyed the show.  If you get a chance between now and the 16th August to go, I really would check it out.  But hopefully if you cannot make it, this has given you a good flavour of what it's all about.

Can't wait for next year!
H

Bloglovin / Twitter / Facebook / Pinterest / Google+ / Instagram

Top 10: Things to look for when buying a Sewing Machine

I get asked a lot at Sew Crafty what to look for when you are buying a new sewing machine, lots of our customers are intimidated by the sheer number of different kinds out there and where to even start looking. Here are my top ten tips for buying a new Sewing Machine. 
  1. Before you dive straight in, why not try and borrow a friend or relative's machine for a while and see how much you really use it and what kind of things you like sewing.  It will give you a better idea of what you like and don't like so you can make sure the machine you choose has those features.       
                                                                                                                    
  2. Be careful of picking a machine with too many bells and whistles. If it is your first machine you may be overwhelmed with too many stitch variations To start with keep it simple, you can always sell on your old machine and upgrade if you feel you are missing out.    
                           
  3. Always buy from a reputable source. I would always recommend buying from a bricks and mortar shop. If your machine is faulty or needs a service (it will eventually need one) you want a place you can go back to. It is not always possible of course so if you are buying online, head to a reputable company like John Lewis, and if you can, pay on your credit card so the purchase is insured.            
                                                                                                     
  4. The added joy of finding a shop that sells Sewing machines locally to you is that you can go and try them out. You can ask questions of the shop owners, they should have good experience and if you have your list of requirements and budget they can hopefully match you to your perfect machine.
                                                                                                                           
  5. Head to online guides like Which best buys or search online for reviews and recommendations for the machine make and model you are looking for.  
                                                                           
  6. Buy the best you can afford, like I always say in haberdashery you get what you pay for and in most cases this rings true with sewing machines too.  
                                                                       
  7. Try and choose a brand with parts that are easy to find locally or again from a reputable online source. It can be so annoying when you want or need to buy a new foot and you can't find where to get it from.                        
                                                                                                                 
  8. When you purchase your machine, find out where you can get it serviced. If you are buying locally you can often take it back to the shop for servicing, but if not you may need to contact an independent engineer. Your machine will need a service every year -18 months after the end of the guarantee to keep it running efficiently. Regular servicing will help to avoid larger repair bills and replacement costs further down the line.                  
                                                                    
  9. Your machine will need to be cared for. It will need cleaning and maintenance to help it run smoothly. Your machine manual will have information about how to dust and oil your machine to get the best results. It should be stored somewhere warm and dry. If it has been stored in the cold make sure you run it for a while to warm it before you start sewing.    
                                       
  10. Ask to see the instruction booklet. It will be your best friend when late night sewing. Your local machine shop owner will not appreciate late night phone calls to chat about tension, but your machine book, if it is a good one, will answer a lot of questions. It should also explain all the accessories and extras that you can get and how to use them. 
I hope that has guided some of you in the right direction when searching for your new sewing machine. If you have any questions, please leave them in the comments below and I will try my best to answer them. If you have already bought your machine and are struggling to enjoy using it, check out my post on How to Fall in Love with Your Sewing Machine

Have a great weekend and happy sewing!
Sammy xxx

Bloglovin / Twitter / Facebook / Pinterest / Google+ / Instagram

Let's Meet: Lucy Alice Designs

This month we got chatting to another Bust Craftacular stall holder in the shape of Lucy Alice Designs.  She does the cutest little animal necklaces, we both ended up walking away with one, H an owl and Sammy a cat necklace, of course!  So let's get down to having a chat and a cuppa I think!

Simple Styling: Bedroom Table

This week I thought I would share a little bit of my new home with a Simple Styling post.  I have been in my own home for around 5 months - crazy how time flies.  I still have lots to do and plenty of places to make my own, pictures up on the wall would be a great start!  But I have managed to make a few spaces just how I want them.

My bedside tables for example got the finishing touches this weekend!  I have been coveting this table lamp from Tesco for ages, I know who would have thought it would be from Tesco!!  I saw them in store, then they were gone the next time I went in, they are sold out and also have been for ages online and so after a little trip via another store, I found them!  They finish off my bedside tables perfectly and so that's why I am sharing.

Bedside tables are places where you keep all the useful and random bits of pieces that do not seem to fit anywhere else.  I am lucky as I get to spread out over 2 tables and so this one is the prettier one!  Hence why I chose to show it!  If you look back on our Mythbusting Blogging post you will know that we keep the messy parts hidden, ha, ha.

On my table I have from top left;  Bamboo and Jade bowl from Oliver Bonas - to keep all my hairbands in, Japanese Daruma Doll - present from a friend from Tokyo, Retro style clock from Joy (this was from a while back and so I found a similar one from NOTHS here), Table lamp from Tesco, H coaster - present from a friend (similar one here), Artist Palette necklace from Kate Rowland, Daisy Perfume by Marc Jacobs.  The Bedside table itself is from Ikea (Brusali) and I changed the handles with some off eBay as I didn't like the black ones it came with.

I like to have collections of things towards the back of the table and so there is a nice clear space for not only bits and bobs, but also I think it makes a nice cleaner space.  I am a person who if there is clutter around everywhere I can't think straight and so this helps to keep me calm.

Keeping the colour in a similar colour way is always good too.  I have kept a bit of a theme in my bedroom and so it is easier to co-ordinate - plus it always helps when you can vary it around one of your favourite colours.  What is your colour theme?  Are you a clutter keeper on your bedside table.  On my other side is my phone, notebook and pen - for those in the middle of the night ideas or worries and usually a drink of water.

H, xxx


Bloglovin / Twitter / Facebook / Pinterest / Google+ / Instagram

Summer Garden Party Wishlist

Cushions from h&m home  /  Hanging planter from h&m home  /  Drinks jar with tap from The Hut  /  Easy peasy ice tray from The Hut  /  Garden table from Oliver Bonas  /  Colourful glassware from Tiger  /  Drinking straws from Amazon

Now that the UK weather has finally decided to behave itself and give us some sunshine, it is the perfect time to head out into the garden and invite round some friends for drinks. If yours is anything like mine you might need to give it a little T.L.C. before you send out those invites though. I have been pinning away and built myself a little mood board/wishlist for my much needed summer shopping trip. Here are just some of things I will be using to bring the indoors outdoors just in time for cocktail hour!

Hope you have a lovely sunny weekend
Sammy xxx

Pineapple photo via Brides.com/ lemon drinks photo from love-the-day.com/ cosy cushions image via 100layercake.com


Bloglovin / Twitter / Facebook / Pinterest / Google+ / Instagram

Make it: Holiday Scrapbook Tutorial

For every holiday I have been on for as long as I can remember I have made a scrapbook when I got home to keep all the little mementos I have picked up and of course house all of my favourite photos of the trip. Why I choose to scrapbook instead of just putting the photos in an album is that I like to record my memories and highlights along with my photos. Also I love using fun papers and embellishments to give a flavour of the place I have visited too.

Food Glorious Food

Over June and into July I have had a few friends over and so I have been trying a few new recipes and so I thought I would share them with you.

These are not my photos and so I cannot take any of that credit, but I can say that they are definitely tried and tested.

First up is a recipe that my friend cooked up for me yesterday morning, always good to have a great cook around the place and we added extra blueberries to this easy 2 ingredient recipe, I found this similar one from the Top with Cinnamon blog.  Very yummy and a great way to start a Sunday, dairy and gluten free.

Next, something which has changed a few of my friends opinion about Quinoa.  This really simple Quinoa, lentil and feta salad from the BBC good food website is super easy to make and I made such a big batch, it kept me going for lunch most of the week too!

and, lastly for today's post is this dairy free Eton Mess recipe, I mean, summer is all about Eton Mess and being as I cannot have cream it's all about finding other ways to enjoy it without suffering.  This recipe from the Lick my Spoon blog is very yummy and curbs those Eton Mess cravings.

Time for lunch methinks, these posts always make me crave food.  Hopefully that has given you some fun things to try.  What's your favourite recipes?  Let us know in the comments below.

H

Note: Photos are not our own, taken from individually linked websites.

Bloglovin / Twitter / Facebook / Pinterest / Google+ / Instagram

Make it: Bias Bracelets 3 Ways

I have a cute summery DIY for you today using one my favourite trimmings right now, Bias Binding. If you read my post in May about how to use it you will have seen how to apply it to sewing projects to get a professional finish, but some of the bias we have at Sew Crafty is pretty enough to use on its own. I thought I would show you three ways to use it to make some cute, summer holiday friendly accessories.