Make it: Colourful Paint Palette

Its a quick but fun little DIY for you today as I really wanted to use some ceramic pens that had been languishing in my craft stash for a while.  I thought what better way to use them than the usual mug or plate designs, than to make a colourful paint palette for the artist in you or as a present.

So, to start, it really is so simple, you will need: a surface to colour in (I used an old soup plate that I usually use as a palette and so it seemed to lend itself well for this project), Ceramic pens/paints or sharpies and an oven.

I decided that I wanted my plate to be the palette it usually is and so splodges of 'paint' were what I was going for.  I had these pens, but perhaps if you were using paints you could give them a curvier edge like paint splatters.
I felt I wanted to add some text too, for a little paint inspiration and so I added the 'get creative' text on the edge of the plate.
Then I popped the plate in the oven for around 30 mins at 160 degrees so that the pen paint will stay on the plate when washed.  Do remember to use a surface that will be able to withstand the heat in the oven otherwise it will crack.  I then added my handmade ceramic pot I use as my water pot (but any mug or cup will do) and its finished, told you it was simple.

You could make this as elaborate as you like with more colours, more text or patterns.  You could even have circles of colour and so your actual paint will go in the spaces.  It easier on a flat surface, painting onto a mug can be hard due to the round surface, but a bit of practice and also a cloth dampened with warm water will take away any mistakes quickly.

Hope you liked this little tutorial, these pens are so much fun for children to use too, so maybe it could be an Easter Holiday activity to keep those little ones busy if the rain keeps coming.

H,xxx

Bloglovin / Twitter / Facebook / Pinterest / Google+ / Instagram

Lets meet: The Things She Makes


Hi again, its Lets meet time and this month we are having a chat with a fellow blogger, so lets see who it is.

Hello! I'm Sophie from the blog The Things She Makes, where I share the things I make, or at least attempt to!

What was the first thing you remember making?
I was really encouraged to make things when I was younger and had a real range of materials to work with.  I remember making friendship bracelets and pressing flowers a lot and I've always been a card maker - grandparents birthdays in particular meant that I would be making something, whether painting a picture or creating a trinket gift.  I also liked to sew - I had some brilliantly bad attempts at fixing my leggings.  But the first real make I can remember is a little air dry clay flower wrap with dried lavender inside that I made for my Mum.  She still has it!

How did you find your creative side?
I think it's something I realised early on - that I wanted to and enjoyed making 'things, rather than felt I had to do.  If you were to ask my family, I'm sure they'd say I've always been creative.  I get very itchy fingers if I haven't made something in a while and I have many post-it notes and lists of ideas - it's something that I've always done.

What has been your favourite ever make? Whether that be for your business or pleasure – tell us about it.
Usually it's trying out those projects that start as an idea and completely work - often for me, its the process of making rather than the final DIY!  I have been honoured to make the Wedding stationery for a few friends, but my Brother's Wedding stationery has to be my favourite make - I loved every minute of it and seeing it all come together on one of the most important days of his life was pretty amazing.
Otherwise, anything that involves glitter and using my glue gun is always a winner for me.

What are your favourite ways to stay inspired?
The blogging community is hugely inspiring - and so supportive.  I'm also a huge YouTube watcher, Instagram stalker and Pinterest browser.  Anything, a colour, technique, pattern or medium can spark an idea or help me find the solution to something that might not have worked out first time.  If I'm stuck in a rut, looking over the lists of ideas I've previously made or left over materials can usually set me off on a project but I think it's also important to recognise when inspiration isn't there and not force it - a little break can be all that's needed to recharge.

Who are your favourite Designer/Makers right now?
Etsy and Instagram are my favourite place to find new makers. I'm a huge fan of typography at the moment (stationery in general, always!) and it's something that I can practice easily whilst my craft stash is in storage.  My current faves are Old English Company, Violet & Alfie, Elsie & Nell, Sir Albert Co. and Skandi Design.

What crafty item is top of your wishlist?
I'm late to the party, but I've wanted, ummmed and aaahhhhed about an electric cutter machine.  I really need one for all the sweet slogan jumpers, t-shirts and bags I have designed in my head!  I'm still window-shopping on that one though.

What do you like to do when you’re not working?
Making something - whether small or a large project - is usually my favourite way to relax and if I'm not doing that, I'll be researching or planning for it.  I'm a big coffee drinker, so I love a coffee shop trip and I can spend many an hour walking around HobbyCraft.  Otherwise, I'm visiting friends and family - particularly hanging out my little nephew!

Tell us a bit about what you have coming up?  any little projects you want to tell us about.
At the moment, I am in the middle of my biggest DIY yet - renovating my new home! Expect lots of house-related DIYs on the blog.  The room I'm most excited to start is the office/studio space!

Lovely to hear from Sophie about what she is getting up to and hear more about how she stays creative.  You can also find The Things She makes on Instagram, Facebook, Twitter, You tube and Pinterest.  So plenty of places to stalk her!

See you next month!
H & Sammy, xxx

Bloglovin / Twitter / Facebook / Pinterest / Google+ / Instagram

WishList: The Works


Take out boxes  //  Mini wooden frames  //  Arrow chalkboard sign  //  Clay and rollers set  //  Dot to dot book  //  Tie dye kit  //  Glitter jars  //  Wooden trinket shelves  //  Heart tray  //  Folding ruler

H and I have a long standing fondness for The Works. we used to spend a heap of time in there as students back in the day and H still uses them a lot for her work at The Lightbox, as their prices are amazingly good. We have compiled our top ten crafty picks from their massive range (it was a struggle to pick just ten) to share with you today and look out as I am sure some of these will be making their way into our D.I.Y. posts in the future too!

First up, the colourful take out boxes would make great, fun gift wrap, or cute storage. Anything mini is a winner for us so we just love these wooden frames as they would be great for kids to decorate. Forget colouring in, dot to dot is our new calming exercise and this book is jam-packed with them. These wooden trinket shelves are just perfect for displaying all those little bits and bobs and Sammy's fave the heart shaped tray, perfect for styling those all important Instagram photos!

They are our top ten pics from The Works. What are yours?? I am off to make my order asap, have a great Easter weekend.

Sammy and H xxx

Disclosure: This post contains sponsored links. We do not work with companies that we don't already support. all opinions are our own. 


Bloglovin / Twitter / Facebook / Pinterest / Google+ / Instagram

Make it: Easy Gold Foil Easter Eggs

I am all about making things easy at Easter time, what with Spring cleaning and de-cluttering I want everything to be fresh and minimal. To carry on my grown-up Easter theme this year, I wanted some table centre decorations that were in-keeping with my theme.  I had a bunch of bits and bobs laying around that I had from other projects so I whipped up some of the easiest, classy Easter egg decorations I have ever made.

To make some for yourself you will need: Polystyrene eggs, Temporary tattoos (I used metallic ones I got free with a magazine) White acrylic paint, paint brush, water bowl and sponge, Mod Podge (or PVA glue), an old box or polystyrene (to stand your eggs in to dry), needles or wire to stand your eggs on.

Step 1. Start by popping a needle in the end of your eggs.
Step 2. Holding each egg by the needle, paint the whole egg with white acrylic paint.  You want it to be acrylic so that when you put the tattoo on, the paint doesn't come off.
Step 3. Carefully push the needle into the box or polystyrene for the egg to dry.
Step 4. Paint all the eggs you want to decorate and leave them to dry thoroughly, then add a second coat and again allow to dry.
Step 5. Next cut out the tattoo that you want to apply and grab your water and sponge.
Step 6. Gently push the tattoo in place, then following the instructions on the pack use the sponge to soak the paper on the back of the tattoo.
Step 7. Carefully remove the paper and smooth down any edges or bubbles in the tattoo with the sponge.
Step 8. Dab the excess water away from the area, then coat with a layer of mod podge to seal it in place, set it back on its pin to dry.

Once they are dry you can hang them up with some bakers twine or like me just pop them on a pretty plate in the centre of your Easter table.
Don't they look classy and so grown up. I love how simple they are and so easy to make.  I am making loads to put in a big bowl for when we have family visiting over the Easter weekend. For more Easter DIY ideas head to our Make it page for inspiration.

What Crafts have you been trying your hand at lately?  We always love to hear from you, head over to our Instagram for a chat @liveit.loveit.makeit 

Sammy xxx


Bloglovin / Twitter / Facebook / Pinterest / Google+ / Instagram

Whats on my desk


We shared our desks way back in January and so we thought we would come back this time with our different desks as we have day jobs alongside blogging.  Last time Sammy showed us her home space and H showed off what was going on at work. This time we have had a swap, so first up Sammy.

Last time I shared my home office desk, this time you get to see my desk at Sew Crafty HQ. I'm sure you can see that my set up is pretty similar but most of the work I do here is planning, admin and photo editing so it is a little more business-like than my home office. The thing that is on my desk most of the time at work is my planner, it is my daily to do list so I have it at hand to make sure I haven't forgotten anything important. I have a few trinkets under my monitor as well as a bunch of sewing supplies to use as photo props when taking photos for our website. To the left of the picture out of shot, is where I do most of the small photography for Sew Crafty so it is handy to have bits and bobs to hand.

Now, for H's home desk.  My desk at home has various duties from work desk, to dining room table and sewing space and sometimes just a dumping ground.  So it can go from looking nice and tidy to messy in a matter of hours.  It is a useful space though to keep many things that I use alot from my many notebooks, diary and for some reason I have my ipad on at the same time as my laptop most of the time!  The rest of my desk around this is a mass of photos, business cards, bills, pen and pencils, things I have made for tutorials - no need to water plants anyone and some bits from HEMA that they recently sent us for some Easter treats, you may even be able to spy the Easter chicks in this picture.  They just epitomise Easter to me!

Any familiar items on your desks?  I think we clearly like just having stuff around us if these pictures are anything to go by.  If you would like to show us and our readers what's on your desk then just send us an email and we can show off other peoples desks too!  Just out of nosiness probably!  ha ha.

H & Sammy, xxx

Bloglovin / Twitter / Facebook / Pinterest / Google+ / Instagram

DIY's I Want to Try: The Craft Studio Books

I have a whole weekend to myself this week so I am going to lock myself up in my craft room with a long list of projects to get stuck into. The giveaway we are running with 'The Craft Studio' ends tonight so I thought I would highlight some of the projects in the books that I want to have a go at myself. 

My 'We Make Collective' dying kit arrived a couple of weeks ago, so I want to have a go at the dip dye tassels from the pompom and tassels book. I have a ton of little canvas bags that need a bit of cheering up so I want to have a go at printing some up with cute designs. I love these little speech bubble brooches, I think I will have a go at some small ones to add to my growing collection of pin badges and last but not least another dye project. I don't know about you but with the 5p bag charge my totes are getting more use than ever so I am planning on giving some of them a makeover.

There is still time to enter the competition, but hurry it closes tonight (18th March at midnight), head over to our original post to find out how to enter to win all four of these cute books.

I hope you have a fun weekend planned, enjoy!
Sammy xxx

Bloglovin / Twitter / Facebook / Pinterest / Google+ / Instagram

Guest Tutorial: The Make Arcade - Felt Succulents

This week we thought we would hand over the Tutorial reigns to someone else for a change.  We have been following Ruth for a while now with her company The Make Arcade.  She holds classes, produces craft kits of all sorts and Sammy even has some in her shop Sew Crafty too.  So without further ado, we will hand over.

Hi! Ruth here from The Make Arcade. Sammy and H invited me to put together a tutorial for their
lovely blog readers - so here goes, great to be here!

You can’t have not noticed the succulent trend that's happening at the moment - I love a succulent
as they are so cute but as someone who hasn’t a great track record at being green fingered I have
used succulents as my inspiration for a felt based craft project and created a felt succulent display!

They are a perfect subject for felt work as all subtly different - full of texture, inspiring colour
palettes and quirky character.

For this project you will need:
A selection of felt- for mine and got a muted colour palette (but
would work equally as well in brights or greys!)
Glue gun (I glued this project but you could sew it too!)
Scissors
Thin card
Display item - my wire basket is from Tiger - but you could use vintage kitchenware, enamelware
or wooden crate perhaps?

We will be making 4 different types of succulent design - you can make as many or as few as your
display item allows, they are quite addictive to make.

When you have made your lovely selection of succulents you can display them. Take your card and
cut it to the shape your your display unit (I drew round the wire basket). This is the basis for your
display. Place your succulents on the card, play around with the layout and take a picture for
reference before you start to stick! Stick all the pieces down, lift leaves to make it really 3D. I added
a few felt balls that I had in my stash too.

When all stuck down, cut away any card that you don’t want to see so you are left with the
succulent piece. I then placed this into my wire basket and secured it with a few blobs of glue. Voila
- one gorgeous succulent display!

So, what do you think?  We hope you loved Ruth's tutorial as much as we did.  We may be biased as we are succulent lovers - you may have noticed!

H & Sammy, xxx

Bloglovin / Twitter / Facebook / Pinterest / Google+ / Instagram

March Food roundup

Its finally starting to come into Spring! Yey. And that means for me a want to be a bit more healthy and try new things.  There is something about a bit more sun and the idea that all is going to be ok.  Also we have a holiday coming up in June and we all want to be a bit more toned and healthy for that - if only so we can eat what we are like when we get there!  ha ha.

So this month I have been looking at meal prep videos and seeing how people eat on a budget so that I can have healthy living without spending too much.

First up, is this Salmon Sushi Salad which a friend sent me from the Good Food Magazine, also on the website.  I love this kind of food and it seems so simple for me to be able to pack it all up for lunches at work.  Just a bit of planning on a Sunday night I think.

Next is this Not Quite Banana Bread, a few of my friends are currently working their way through Sarah Wilson's, I Quit Sugar book and this recipe looks like a good alternative for a treat.   I love banana bread and as is dairy free too, seems like a good choice for us all.

Bottom left of the pictures, is a bit of a sinful treat in this Rhubarb baked Oatmeal and I can't quite work out what appeals for me most as I am not a big fan of Rhubarb, but I want to try more fruits, so this seemed like a good place to start.  A bit more sinful than the last cake but it looks so good.

Last, but by no means least is this Cauliflower Coconut & Chickpea Curry, all the C's.  I love a good curry and this seems too good to miss.  I have been loving the Mind over Munch website too, so many good ideas for lunches and planning meals.

I am definitely in the meal planning zone at the moment as it saves so much time and money.  For little old me on my own too, its a great way to have a variety and not resorting to bad foods or takeaways.

Do you meal plan?  What are your tips?  I am loving to freeze a portion of everything I make too, so that I can always have it another time, when I am not in the mood to cook.

H,xxx

Please note:  All photographs are from the websites listed with each recipe.

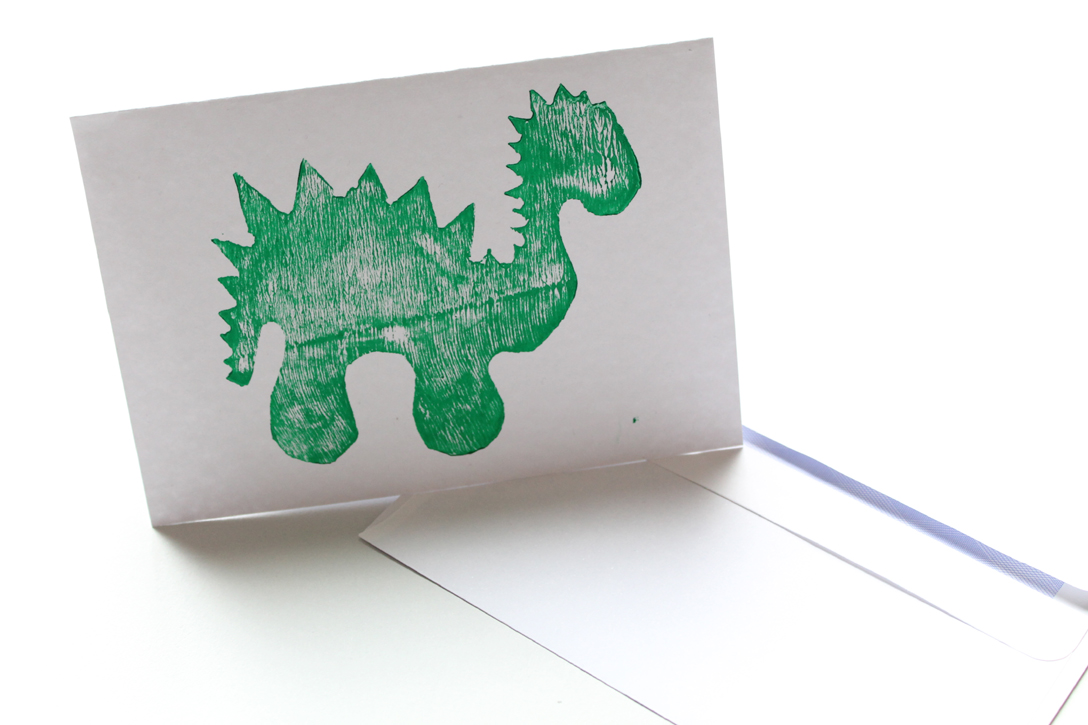
Make it: Dinosaur birthday card linocut print

Hey all, after my Geometric Print tutorial way back in January, I thought it was about time to step up the printing game and show you another technique of Linocuts.  This also shows one of the printing techniques in one of the craft books you can win over on the blog this week, see the post here for more details (competition only open until the 18th March 2016).

I have always been a fan of the easy carve lino, it makes life so much simpler and is easier to handle and gives you less cuts on your hand - always a good thing!  On that, one thing to note is that the tools are sharp, so watch your hands, always carve away from you or your hand and keep plenty of plasters around - just in case.  Just like papercutting, this can be a dangerous game!  So lets get started.

You will need:  Lino of some sort (I found this easy carve lino in Tiger), Card or whatever you want to print onto, ink roller, Safety hand guard, tea towel or something to protect your surface, paintbrush, pencil, lino cutter with different blades, rubber, acrylic paint.  You may also need a tray to put your paint in - not pictured.  You can buy a starter kit from places like Cass Art.

Step 1:  Start by drawing your design onto your lino, I chose to draw this cute dinosaur.  The pack from Tiger comes with some handy pieces of tracing paper to use so that you can get your design right before going onto lino.  But otherwise just draw straight onto it.  Pencil is better to use as then any ink will not bleed when you use any ink or paint later.  Remember as always with printing, anything you draw will be mirror imaged when you print.  So if you want something to be a particular way around, draw it the opposite way.

Step 2:  Then you can start to carve.  Always carve away from you and I like to try and get as much carving done in the same direction.  But sometimes it is easier to follow the outline first and then carve away from it.  It is up to preference of how you find it works better for you.  I would start with a simpler picture first, curves actually work out easier to do rather than sharp points and straight lines.


You could also use a hand safety guard if you prefer so that you can push against it for leverage and keep your fingers intact!  The idea with lino is to cut away any parts that you do not want.  This lino from Tiger is great as it has a different colour in the middle of it and so you can see when you have taken away enough.  It is also very thick, which helps as I like to cut down to about half the thickness of the lino so that I can make sure that the right areas will not come out when printing.

Step 3:  When you have finished carving you will have a lovely pile of lino to get rid of and be able to see your design in more detail.  You can then go around and make sure there are no parts that will go above your design, so that it will add to your chosen design when the paint is added.

Step 4:  Add some of your acrylic paint to an old tray or glass chopping board and using the ink roller roll it out to cover your roller and make sure all the paint is spread evenly.  I find acrylic paint is better to use as it is stickier and so keeps to the roller and lino better.

Step 5:  Then you can proceed to cover your lino with the paint.  At this point if there are any areas that are too high, then you will be able to see them and so can cut them away before printing.

Step 6:  Get your card or whatever you want to print onto and put it onto a surface where paint doesn't matter if it gets onto it.  I always use an old tea towel, so that it gives a good soft surface to press onto too.

Step 7:  Then position your lino on top of the card, making sure you don't move it, just press down.  Some people like to use a clean ink roller and go over the top to make sure it is fully pressed.  Then start to peel away the lino, again making sure you don't move it, or it will smudge.

You will then have your finished card!  This one is perfect for someone who really loves dinosaurs!

These are some of my other linocuts, I have so many more, but I thought a sample would do.  You can cut them so that it is only the outline you see, like the elephant.  Or you could cut around the lino to make an outline without having to carve the whole of the outside like the giraffe shape.  You can add a small cut to a block so that it is easier to handle for printing, like the leaf one here.

I hope you enjoyed learning how to do more printing, I think I will do a few more of these tutorials to show different ways of printing, as I find it quite therapeutic.

What would you like to learn to print?  Any who would you make it for, let us know in the comments below.  Also if you do have a go at any of our tutorials please do #livelovemake on twitter or instagram and so we can take a look.

H,xxx

Bloglovin / Twitter / Facebook / Pinterest / Google+ / Instagram