Have a Great Christmas!


We wanted to pop a little note on the blog to wish you all a very Merry Christmas and Happy New Year!

We will be taking a small break over Christmas, but will be back before you know it at the beginning of 2016!  Whoop. 

We have had a great time this year with lots of tutorials, fun times and food.  Long may it continue.  We are so very happy that you guys come along for the ride and we are planning bigger and better things in the New Year, so keep an eye out.

Enjoy some rest, lots of food and plenty of time with those you love, and we will see you on the other side!

Much love
H & Sammy, xxx
 

Bloglovin / Twitter / Facebook / Pinterest / Google+ / Instagram

Make it: Ipad/Cookbook holder

I found this tutorial on A Bubbly Life's blog and so thought with my leftover copper after the candle holder tutorial, I would give it a go.  I love the idea of using this in your kitchen to cook up a storm either by using a handy You tube clip from Sorted food or getting out your cookbook from the cupboard to give a new recipe a go this Christmas.  It's such a simple thing to make too, only took about 20 minutes, so perfect for a last minute gift idea.

Let's meet yearly roundup


It's coming to the end of the year and not only that but it's the last few online shopping days to get items in time for Christmas and so we thought that not only would we do a round-up of all our great "Let's Meet" interviews this year, but also it might help with those last minute present ideas.

Well, it is Christmas, so ...


I think this image says it all hey.  I think sometimes we get bogged down with the expectation and this time of year brings up people we miss, things we feel are not going right and also that we should be happy all of the time - no one is Mary Poppins.  But you know what it's ok to do what you want whether that be go all out and spend everything, or stay at home and eat a can of soup.

Just enjoy it.

Thought I would keep it short and sweet today as we have had so much to keep you going on the blog, more to come too.

H,xxx

Bloglovin / Twitter / Facebook / Pinterest / Google+ / Instagram

Monogram Gifts

Letter tags  /  Letter stamp  /  Letter stocking  /  Floral letter  /  Marquee letter  /  Letter pouch     Letter print  /  Letter tag  /  Letter make-up bag  /  letter notes  /  Letter Stocking (DIY)  /  Letter Card

Nothing says 'I bought this just for you' like a gift embellished with the recipients initial. Monograms are a great way to make a gift really personal. These are my pick of the best options around this Christmas. Of course I had to slip in cheeky DIY in there, but adding an initial to an existing gift is also easy to do with a tag or a motif.

How are you getting on with your Christmas gift buying? Are you all done and wrapped or are you just beginning? I'm looking forward to finishing mine off this week, then the wrapping will commence!

Have a great weekend
Sammy xxx


Bloglovin / Twitter / Facebook / Pinterest / Google+ / Instagram

Make it: Copper Candle Holder

This year is all about Copper as we must all know by now and so I thought what better way to make a gift for someone this Christmas.  I was kindly sent a gift voucher from the guys at B&Q and there will be a few more treats to come, but I thought this was a good place to start!  What better way to get the table decorated this Christmas than with a candle holder for your centrepiece, or just to make as a present for a copper loving friend who is into the industrial look.


You will need: 15mm Copper Pipe, cut into 1 x 18cm, 1 x 13cm, 2 x 11cm, 4 x 4cm, 4 x 2cm.  2 x 15mm equal tee, 8 x 15mm elbow (I only have 4 in the picture, oops), 2 x 22mm x 3/4" female straight top connector, Glue (I used Gorilla Glue), Pipe cutter, pen, ruler, candles.

Firstly you will need to cut up all your bits of pipe.  I used a pen to mark the measurements of length I wanted and cut them all first to make sure I had everything.

Step 1: Glue 2 of your 4cm pieces into either side of the equal tee - do this for both equal tee's.

Step 2: Glue your elbow pieces into one end of the 11cm pieces and then the equal tee sections, making a square shape.  You will need to make sure your equal tee open section is upwards and straight so that what you connect into it points upwards.  You can of course make your measurements for this square base larger or smaller depending on your desired size.

Step 3: Glue one of your candle lengths to a elbow and then one of the 2cm pieces on the other end, before adding another elbow and 2cm piece to make a bend in the pipe.  You can now glue on what will be the candle holder, the straight top connector.  You can always get these without the nuts or take them off, but I decided to leave mine on.

Step 4: The last thing to do is glue in both of your tall lengths into the equal tee that is pointing upwards and you are done.


This is quite a simple version, you could of course add more equal tee's and make the whole thing larger to introduce more candles.  Perhaps some straight holders and some smaller ones, so that it had a large candelabra effect for decoration.


I like the simplicity of this one as I have just the perfect person to give it to.  It would look great with other candle holders and decorations too for all other times of year.


How would you make yours?  If you make one, don't forget to send us a picture and #livelovemake on Instagram or twitter so that we can see what you make.

H,xxx

Please note: The materials were bought with a B&Q gift voucher but they did not recommend products or have any influence on what I made with it. Thank you B&Q!

Bloglovin / Twitter / Facebook / Pinterest / Google+ / Instagram

Christmas Food Round-up

It's nearly here, fill your face with food Christmas time!  I thought a few little treats to keep me on the dairy free straight and narrow would be good to take a look at and of course get me drooling a little bit early!

First up, this perfect roast chicken from Elena's Pantry, lets face it most roast chicken is dairy free, but I am yet to get my roast chicken quite right, so looking up a recipe is always good for me.

Next, these amazing looking sticky roasted parsnips from BBC good food would be the perfect accompaniment with the chicken and some roast potatoes and stuffing of course!

Add a bit of bread like this one from the Pure Dairy free website and you can mop up all that gravy left over.  yum. Seriously I am drooling here just writing this!

Then, the most difficult of projects to get dairy free, the pudding!  I am not a fan of Christmas cake or Christmas Pudding or even Mince pies, but I do love a Chocolate Yule Log!  My mum made this amazing one with Coconut cream last year - hoping for that again if your reading mum.  But this one from Lachie's Allergy Cookbook looks great too.

I definitely need to go and get some lunch now.

What's on your Christmas food list this year, any new food for the table?  Let us know in the comments below and maybe we can add them to our table this year too.

H, xxx

Bloglovin / Twitter / Facebook / Pinterest / Google+ / Instagram

Make it: Kate Spade Inspired Glitter Accessories

It is without doubt the time of year to add some sparkle to your accessories.  Today I have three simple DIY's that are inspired by one of my favourite designers Kate Spade.  Not only are they are so simple and look amazing but they are also budget friendly.  One A4 sheet of glitter fabric is more than enough to make all three accessories,  I am going to show you how to make simple shoe bows, earnings and a statement clutch bag.  I have used an old clutch bag but you could easily make a simple zip-topped pouch using our make-up bag tutorial. 

You will need: Glitter fabric, shoe clips, earring backs, pink ribbon 3mm and 15mm wide, a black clutch bag, glue, chalk pencil, a scrap of felt and scissors. 

For the shoe clips:
Step 1. Cut two strips of glitter fabric approximately 3.5cm wide by 25cm and fold the two short ends into the centre and glue them in place.
Step 2. Take a short length of 15mm pink ribbon and wrap it around the centre of the glitter bow. 
Step 3. Glue a shoe clip in place on the back, to the bow at the top.
Step 4. To make it more secure glue a small piece of felt over the top of the clip. 


These bows are so simple to make and they would make really cute brooches too, or you could attach them to gifts to make your Christmas wrapping look extra special.


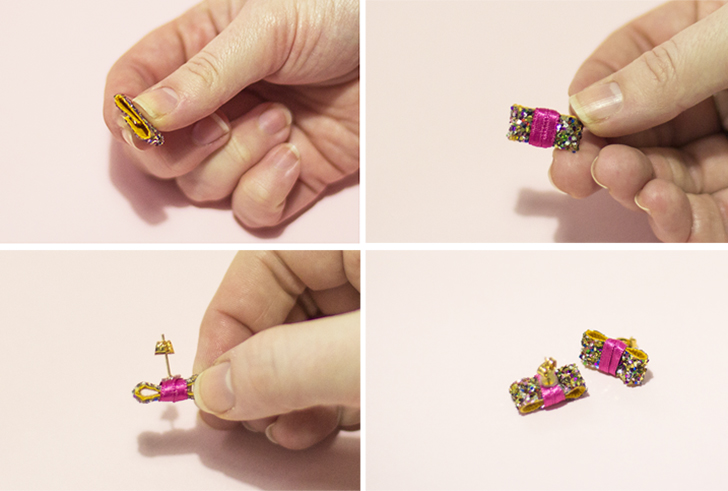
For the bow earrings:
Step 1. As with the shoe clips you want to cut two strips of glitter fabric approx 4.5cm long by 1cm wide. Fold the edges to the middle and glue them in place. 
Step 2. Wrap a small length of 3mm ribbon twice around the centre of the glitter bow and glue the ends. 
Step 3. Glue a small earring post (or clip) to the centre back of each bow. 


For the statement clutch bag:
Step 1. Decide what word or phrase you want to have on your bag, then using a chalk pencil mark out the letters you need on the reverse of the fabric with a chalk pencil. Remember to flip the letters so they are the right way round when you turn the fabric back over. 
Step 2. Cut out each letter.
Step 3. Glue the letters to your clutch bag.


And that's it, a simple and fun way to sparkle up any outfit this holiday season especially if you are on a budget, as the supplies for all of these DIY's cost under £10. 

What holiday parties are you going to this year? Are you throwing a holiday party? If not don't worry because these would also make great gifts for your party animal friends! Don't forget to #livelovemake to show us your DIY's from our blog, 

Sammy xxx


Bloglovin / Twitter / Facebook / Pinterest / Google+ / Instagram