It is without doubt the time of year to add some sparkle to your accessories. Today I have three simple DIY's that are inspired by one of my favourite designers Kate Spade. Not only are they are so simple and look amazing but they are also budget friendly. One A4 sheet of glitter fabric is more than enough to make all three accessories, I am going to show you how to make simple shoe bows, earnings and a statement clutch bag. I have used an old clutch bag but you could easily make a simple zip-topped pouch using our make-up bag tutorial.
You will need: Glitter fabric, shoe clips, earring backs, pink ribbon 3mm and 15mm wide, a black clutch bag, glue, chalk pencil, a scrap of felt and scissors.

For the shoe clips:

Step 1. Cut two strips of glitter fabric approximately 3.5cm wide by 25cm and fold the two short ends into the centre and glue them in place.
Step 2. Take a short length of 15mm pink ribbon and wrap it around the centre of the glitter bow.
Step 3. Glue a shoe clip in place on the back, to the bow at the top.
Step 4. To make it more secure glue a small piece of felt over the top of the clip.

These bows are so simple to make and they would make really cute brooches too, or you could attach them to gifts to make your Christmas wrapping look extra special.
For the bow earrings:
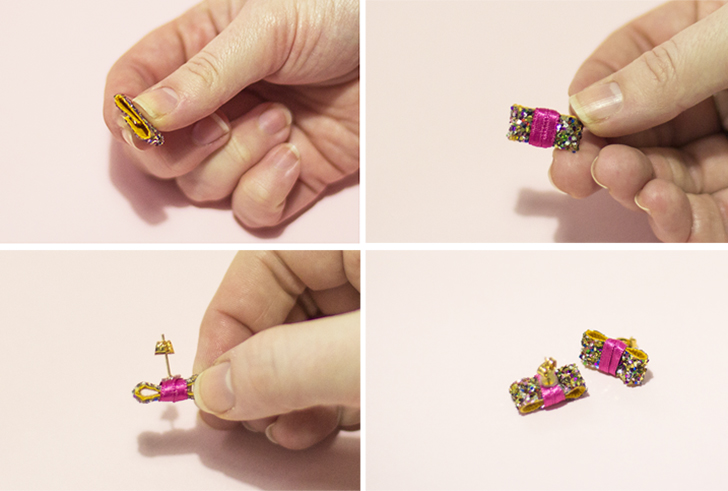
Step 1. As with the shoe clips you want to cut two strips of glitter fabric approx 4.5cm long by 1cm wide. Fold the edges to the middle and glue them in place.
Step 2. Wrap a small length of 3mm ribbon twice around the centre of the glitter bow and glue the ends.
Step 3. Glue a small earring post (or clip) to the centre back of each bow.
For the statement clutch bag:
Step 1. Decide what word or phrase you want to have on your bag, then using a chalk pencil mark out the letters you need on the reverse of the fabric with a chalk pencil. Remember to flip the letters so they are the right way round when you turn the fabric back over.
Step 2. Cut out each letter.
Step 3. Glue the letters to your clutch bag.


And that's it, a simple and fun way to sparkle up any outfit this holiday season especially if you are on a budget, as the supplies for all of these DIY's cost under £10.
What holiday parties are you going to this year? Are you throwing a holiday party? If not don't worry because these would also make great gifts for your party animal friends! Don't forget to #livelovemake to show us your DIY's from our blog,
Sammy xxx

Bloglovin / Twitter / Facebook / Pinterest / Google+ / Instagram