May Makers Month round-up

Wow, what a month hey!  We have had so much fun sharing some really fun stuff with you this month, from tutorials to advice, we have certainly had it all hey!  We thought for those who might be catching up this bank holiday Monday, a round up post would be just what you need to make sure you don't miss a thing!

Makers Month: Makers Wishlist


Our first Spring Makers Month is almost over and we couldn't round it up without sharing some of our favourite pieces from some of our favourite makers. So here are our picks, honestly there are so many amazing creators around it is a constant battle to choose! We share our best finds weekly on our instagram @liveit.loveit.makeit so head over and turn on notifications to keep up with all our posts.
Have a lovely long weekend
Sammy xxx

Bloglovin / Twitter / Facebook / Pinterest / Google+ / Instagram

Makers Month: Make it: Animal Storage Jars


Another Wednesday and another cute make from one of our Maker buddies. Today we have the lovely Hannah of Crafternoon Cabaret, who you may remember from our interview with her a couple of summers ago, to show you haw to make these adorable quick and easy Animal Jars for storing all your little supplies. Welcome Hannah!

Hello everyone.  My names’ Hannah and I run Crafternoon Cabaret Club – a craft blog and award winning event that combines craft workshops with live cabaret performances.  I am a firm believer in surrounding myself with creativity and I love filling my home with handmade items that will bring a smile to my face so I thought I’d share a really easy and fun DIY with you today for cute animal storage jars!

If you’re anything like me you always have lots of projects on the go and storing smaller materials like jewellery findings, beautiful threads and even washi tape can be a challenge.  I’ve found using jam jars is a great way to keep my materials organised – so why not make those jam jars a fun feature with a little DIY.

For this tutorial you will need: Jars with matching lids, Gold Paint (or a colour of your choice), Paintbrushes, Plastic toy animals – I’ve used little bath toys for mine but toy dinosaurs and zoo animals also look amazing (just make sure they fit nicely onto the lids of the jars) and a Glue gun.


1.  Paint your toy animals and jam jar lids gold.  You want to have a really even finish with no original colour showing through so I would use at least 2 coats, allowing your paint to dry in between.
2.  Leave to dry completely


3.  Glue your animals into place in the centre of each lid using a glue gun
4.  Stock up your jars with crafty materials, twist on the lids and check out your new golden menagerie of storage!


I’d love to see if you have a go at making this DIY – simply share with me @crafternoonclub on twitter or using #crafternoonclub and of course #livelovemake


And if you like your craft with a sprinkling of cabaret why not check out our next event at The Book Club, Shoreditch on Saturday June 11th 2 –4pm.  As it’s the year of Punk we’re celebrating with a customising workshop – bring your jeans, jackets and bags and customise with embellishments, lino printing, and fabric paint.

Check out www.crafternooncabaretclub.com for more details.

Thanks for stopping by Hannah.

I don't know about you but we are off to raid our nieces toy box for bits and bobs to stick on the lids of all our old jam jars!

Sammy and H xxx


Bloglovin / Twitter / Facebook / Pinterest / Google+ / Instagram

Makers Month: Branding Q&A with HAM

Way back at the beginning of our Makers Month we had a brand Q&A with Kim from Finest Imaginery and now we thought we should share another great perspective on branding with Jo from HAM.  So let's hear what insights she can give us to making your brand work for you.

Hello Jo, Could you tell our readers a little about yourself and your business?
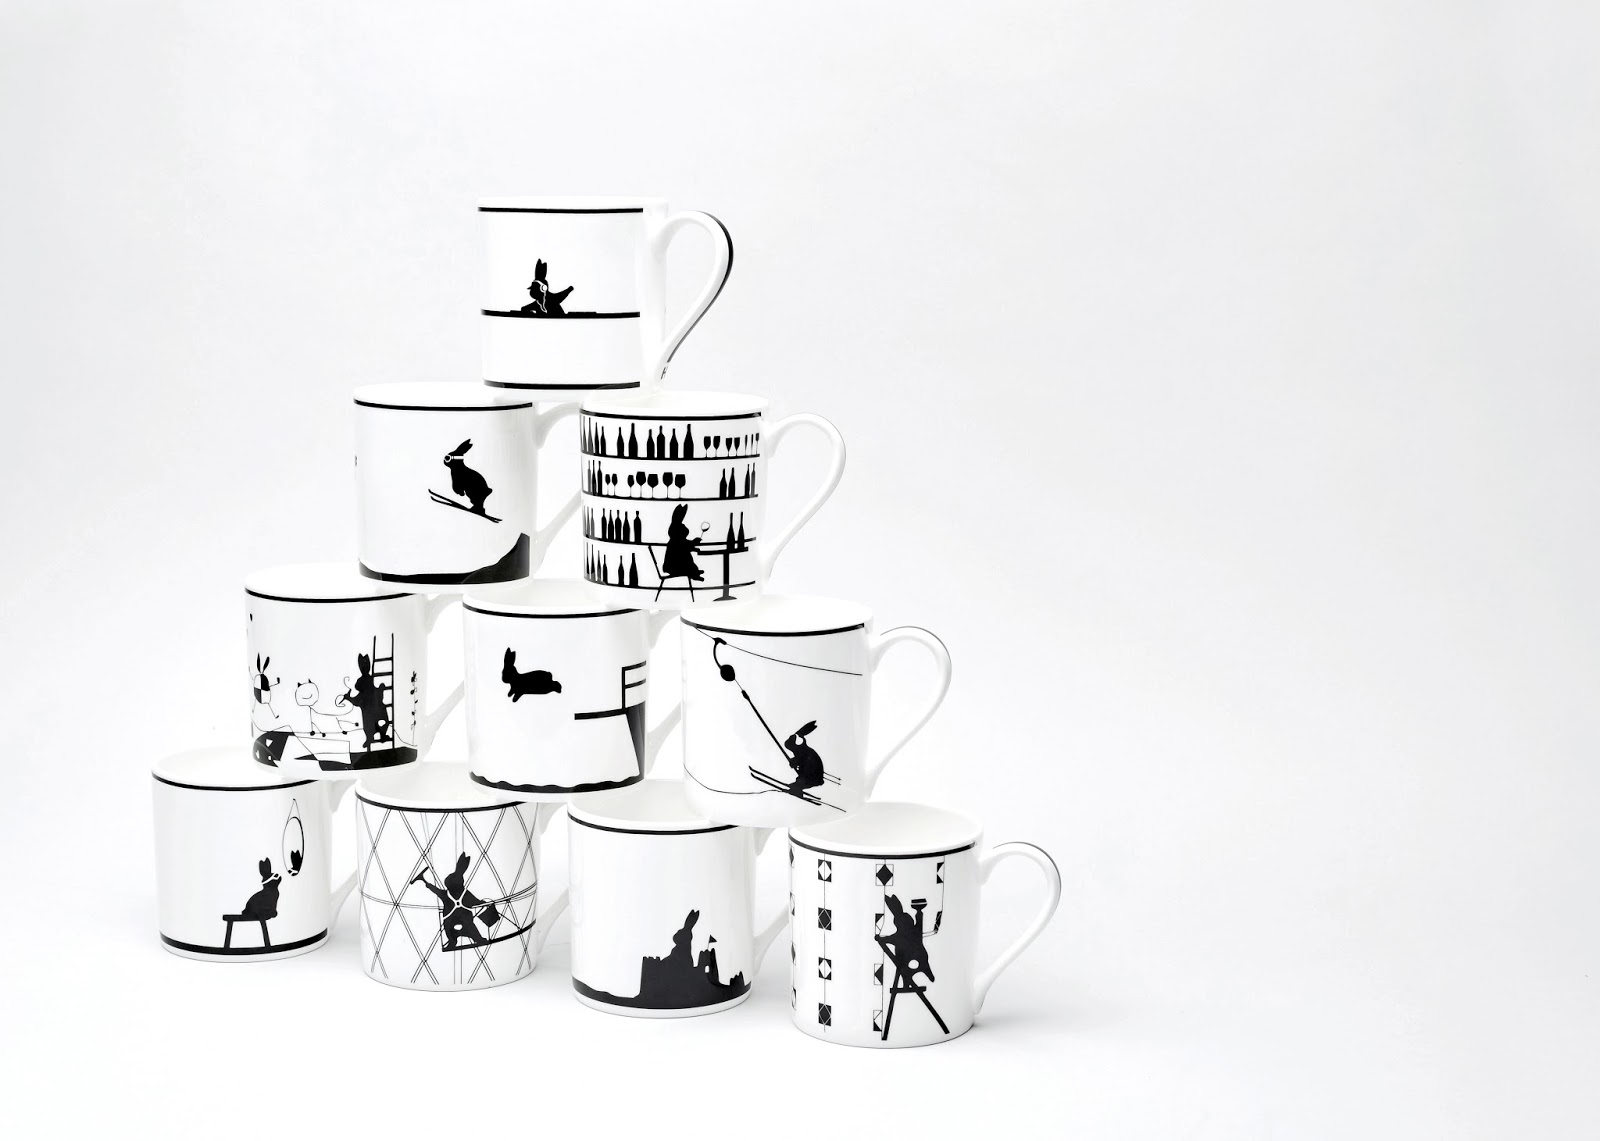
Hi! I am the illustrator behind HAM and spend my time capturing moments from the contented life of Rabbit on a range of ceramics, wall art and paper goods. We sell direct online at hammade.com and through our family of stockists around the world.

Where/when did you decide that you wanted your own business?
I started working on HAM in 2010 after making the tough decision to leave the job I loved at the brand consultancy Wolff Olins. A lot of factors got me to this point: I’d always been hungry to start a business having grown up surrounded by people doing their own thing - both my parents and brother run companies. I’d also studied fine art at university and although I was working at a creative agency, I was a strategist and longed to be physically designing and making. The final push was getting ill in my mid 20s, which came a bit out the blue, and stopped me in my tracks for a year. I had to take some time off and whilst I was away I started filling up my sketchbook again and the HAM idea was born. Returning to work was definitely the best thing for me but my outlook on life had changed and I was now very much focused on living for the moment, so I took the plunge, left work and launched HAM in 2011.

Who do you design for?
HAM has quite a broad reach. I always hope to create things that all ages can enjoy. And I try and keep the themes and humour universal so language or culture isn’t a barrier.

Do you think you need a brand identity?
Absolutely! Brand is often mistaken as just a logo or the look of a business but it can do so much more. Think of your brand as an idea, something that defines what makes you special, then use it as a guiding principle or a blueprint for all that you do. Staying true to what you stand for will help keep your offer authentic and consistent and it’s a really powerful tool for helping make decisions about opportunities that come your way.

Does using social media help to build your customers?
Social media has revolutionized the way we do business, cutting out the middleman and enabling us to have a
direct conversation with a ton of potential customers all over the world. It’s a big part of our marketing strategy and best of all it’s free! It is evolving so quickly it’s tricky to keep up. We have a presence on Twitter, Pinterest, Facebook and Instagram (my fave) and I’m keen to get to grips with the next wave of apps… Snapchat is next on my list!

Top tips to building your brand.
- Really think about what you stand for as a designer, the idea driving your work and how that makes you different.
- Use brand as brief for all areas of your business: from the development of collections and deciding which events to show at, to planning collaborations and figuring out your tone of voice.
- Get family and friends involved. There are always ups and downs so share concerns with those around you and gauge feedback wherever possible.
- With time and experience your brand will naturally evolve so don’t be worried if the offer or brand idea changes and needs a refresh.
- Invest time in thinking about your customer experience. Use your brand to help make packaging, web content, newsletters and social media really unique.
- Keep striving to think how can I make this better? And don’t forget to celebrate the good times!

Time to share the love, name some of your favourite designers.
There is a gang of us that all started around the same time – we see each other regularly at trade shows and we’ve become pals, something that’s important when you work in such an insular way. It’s been amazing to watch their collections flourish and their following grow. Aside from loving and respecting what they do they are all ace people.  Highly recommend checking out…

Thanks so much Jo for having a chat with us about her brand and that super cute rabbit!  Some great new people to stalk (We mean check out) on social media too!

Hope you have found it useful and it may have given you some inspiration into making your brand work for you more!

H & Sammy, xxx

Bloglovin / Twitter / Facebook / Pinterest / Google+ / Instagram

Makers Month: Lets Meet: Nylon Sky

It's a bumper crop for you this month as we have another Let's Meet for #makersmonth.  This time we had a chat with Jennifer from Nylon Sky.  We have admired her work for a while and so are super excited to bring her work to your attention - if you haven't seen it before now of course!

Makers Month: Make it: Shibori tie dyed curtains

 
Dyeing fabric is a bit of a new obsession for me and one which if I’m not careful may consume my entire house! I had dyed fabric in school and university but recently had another go with as it was the focus of one of my We Make Collective boxes. If you want to know all about this and what I did with my kit you can read about it here.
 
So when Sammy and H got in touch to see if I’d like to share a DIY on the blog I thought my dyed curtains would be perfect to share as it’s super easy!

What you’ll need: White cotton curtains - or any cotton fabric, Dye - I used indigo dye from the kit but normal fabric dye will work too, Rubber bands/string, Rubber gloves.
 
Step 1 - Dampen your fabric to encourage the fabric to absorb the dye more readily

Step 2 - Mix up your dye as instructed on the packet. I used indigo dye which can be a little trickier to get ready but once you’ve mixed all the ingredients it should have a film on top like this...

Step 3 - Tie up your fabric with your rubber bands or string. You can follow traditional patterns such as pleating or marbling or just make it up as you go along! The basic rule is that wherever you tie on a rubber band it should prevent the dye from reaching the fabric and create a pattern. I chose to pleat my curtains so began by folding them both with the same sized pleat by laying them next to each other as I folded.
 
This was by no means an exact science but again all adds to the charm of the overall effect. Once I had pleated both curtains I attached my rubber bands along the fabric. Mine are blue as I had used them previously.

I wanted to try and get them fairly evenly spaced on both curtains to create a similar effect when dyed.
 
The most important thing is to make sure that you tie the rubber bands or string on tightly as if you leave any room for the dye to get in you wont see any pattern when you take them off.
 
Step 4 - Dye your fabric! You want to immerse the fabric in your dye carefully to avoid spillages and wearing gloves can help to prevent funny coloured fingers! It will probably float on the top so make sure you keep turning it every now and then to achieve an even dye. Again follow your dye instructions for this. If using indigo dye you only need to leave your fabric in the dye for a few minutes and then take it out where it will slowly turn from green to blue as it oxidises.
 
Step 5 - Hang to dry & then display!

I have also used this technique as part of my year long creative project #daphnerosainbloom where I am using a different flower in bloom each month to inspire me to create something and blogging about it here. April's tulips definitely benefited from my new obsession!

I hope you enjoyed the DIY and have lots of fun exploring the world of dyeing! I’d love to see any of your efforts so do be sure to tag me on Instagram if you share. You can find me at @daphnerosaflowers.

Kate, x

Thanks so much to Kate for this fabulous tutorial, don't forget to #livelovemake on Instagram or twitter if you give this a go and tag @daphneroasaflowers too of course!

Now, what can we use for all the Shibori dying we are going to be doing! ha ha
H & Sammy, xxx

Bloglovin / Twitter / Facebook / Pinterest / Google+ / Instagram

Makers Month: Whats on all our desks

We thought as this month is all about the makers it would only be right to get a bunch of our fave creatives to share their desks rather than ours for a change and who doesn't like a nosey at other peoples workstations!! Here are a bunch (and we mean bunch) of amazing desks from some amazing makers, enjoy.

Makers Month: The Design Process of Custom made

Hey, so today we thought we would have a little chat with Anna from Custom Made about her business and how she got started.  Custom Made is one of those businesses that always looks so polished at all the craft fairs and so we thought a little insight into her design process might be fun.  Also it gives us an excuse to look at all the pretty on her website!

Could you tell us a little about you and your business?
Hi! My name is Anna Butler and I run a company called Custom Made. We design and manufacture a range of jewellery and accessories in a studio in Oxford, UK. We sell Custom Made via our online shop, and have round 35 stockists.
I did a degree in Fashion design, and prior to starting Custom Made I was a menswear designer.

How did you start?
I know lots of peoples motivations for starting a business are different. I felt like I needed a change from my  job as a menswear designer. I felt like I needed a new challenge, but I didn’t know what that was, so I took a big leap and left my job with no plan. A couple of months later I started working on Custom Made without a clue what I was doing. But with the driving mantra being ‘ I will not fail at this’ it all worked out in the end. Not that this is the end! 

It would be great to know how you design your products, how you do develop a new design?
This is probably the hardest question to answer. I feel like every items/range is different. I spend a lot of time sourcing raw materials. Often raw materials can really spark my imagination as to a whole range of product. One little piece of metal can spark the thought process for a whole collection. Or just putting three colours together, those three colours can mark the start of a new collection. Then the ‘hands on’ work starts. With laser cut jewellery for example, I lay out on my desk lots of chips of coloured acrylic, metal components and simultaneously draw shapes in illustrator then print them out and play with the shapes, laying the metal components onto the drawings. It’s a very satisfying process. It often takes a little while to get all the components for new products into the studio to get samples made. I love this part of the process and get very excited when the final pieces arrive to get initial samples made. Our postman thinks I’m crazy ‘oooh new chains’ or ‘ooooh I’ve been waiting for this cord’

Do you have lots of designs that you go through before deciding on a final piece?
I don’t. I usually know what I want things to look like and because I draw in colour I can usually tell exactly what colours I want pieces to be in. I don’t do tons of sampling. I do probably an A4 page of drawings to get something right. I also make little mock ups. You can often find me with looking in a mirror with a mock up earring stuck to my ear with blue tak!

How many ex-ideas do you have around your studio?
Not many. I do have bits of raw materials (laser cut pieces) I have ended up not using but these bits are often very useful when designing new product for mock ups etc.

Do you ever go back to a design idea?
Sometimes I do go back to a design idea. Sometimes something that I think doesn’t quite look right initially, I will have a different view of later. I have a work bench where I leave work in progress. I will keep revisiting items and tweaking them if they aren't right first time.

What is your favourite piece ever made?
A few seasons ago we made a little geometric cat brooch in acrylic. It took me AGES to get the drawing right for the piece. It was the ears! I just couldn’t get them right. Anyway, the brooch was so popular so fiddling around with those ears for ages paid off.

Does another designer have an item you wish you had designed yourself?
There are lots of superb designers whose work I really love and admire but I like buying work from them to wear or hang in my home. Buying beautifully designed work is a real treat. I don’t wish I had designed these pieces myself, I am happy they have been designed for people like me to buy and enjoy! I’m a real sucker for art and prints.

I love finding out more about how people design - think its the designer in me waiting to get out.  This last picture is one of my favourite Custom Made products, I kept looking at it at craft fairs until I finally gave in and bought it.  So simple and looks great with anything.

Hope you liked seeing into Anna's Custom Made world, we are treating you this month aren't we!
H, xxx

Bloglovin / Twitter / Facebook / Pinterest / Google+ / Instagram

Makers Month: Make it: Faux Leather tassel Keyring

Today we are handing over the DIY reins to our new Instagram crush Sam from Fantastic Crafty Fox! We are loving her bright pastel clutch bags and cute stationery accessories. A fellow stationery addict to join the party! whoop! Let's dive in shall we...

Hello, I’m Sam from Fantastic Crafty Fox, I make handmade bags and gifts and have just last week, launched my very own Etsy store! I have been asked by the lovely H & Sammy to write a DIY post for you all to show how you can make your very own tassel key ring. It’s really simple and easy to follow!

DIY Tassel Keying
Tools you will need:
Fabric – enough to make a 12cm by 12cm square and a little bit extra. This can be any fabric you like; today I am using a lilac leatherette fabric
Rotary cutter or craft knife or Fabric scissors (normal scissors are good too as long as they are sharp enough)
Ruler or set square
Pencil/Chalk
Cutting mat – again this is optional, more needed if you are using the rotary cutter or craft knife
Glue - this can be super glue or if you have a glue gun, perfect!
Keyring loop

1. First step, draw a square on the back of your fabric measuring 12cm x 12cm
2. From the top of your fabric drop down 2cm and draw a line across the full 12cm.
3. Then below the line mark across 1cm strips going down - this will be your guide when cutting. I have used a pencil so you can see it better but chalk is fine too!
4. Once you have your square and lines added, then you can begin to cut out. I find best to cut around the square first so it's not too fiddly. Once the outside square is cut out then you can begin to cut down along the vertical lines.

5. Next you will need to cut out a separate piece of fabric that is 1cm in width and 8cm length - this will be the loop you will need to attach your keyring to. Once cut out then fold in half.
6. Now place your folded loop on the top left or right hand corner, then begin to roll towards you - make sure you leave about 1cm-2cm unrolled for you to glue.

7. Next is the messy bit! Glue the unrolled section and push together to seal; you can use a glue gun or super glue. Once done leave to dry, this shouldn't take too long.

8. Once dry add on the keyring loop and ta-dah you have yourself a tassel keyring! Add this to your keys or even a bag to accessorize.

I would love to see if you gave this a go! Tag us in your photo makes @fantasticcraftyfox and @liveitloveitmakeit so we can see #makersmonth and #livelovemake
Thanks!

Thanks to you Sam for joining us for Makers Month! I am so jealous of all those cute craft supplies! Can we come round for a craft day at your place please!?

Head to all the usual places to find the gorgeous Fantastic Crafty Fox!
Sammy and H xxx


Bloglovin / Twitter / Facebook / Pinterest / Google+ / Instagram