

Showing posts with label Sewing. Show all posts
Showing posts with label Sewing. Show all posts
Make it: Drawstring Laundry Bag
OMG! We are in an Actual Book

Sew Crafty Sub Club 2017 with GillyMac Design

Introducing a brand new venture for Sew Crafty, in association with the fantastic GillyMac Designs!
Make it: Cute Bunny Toy

Make it: Faux-dori Notebook Planner

Make it: Travel Fabric Dolls House

Sew Crafty Wishlist

Whats on our desks - April
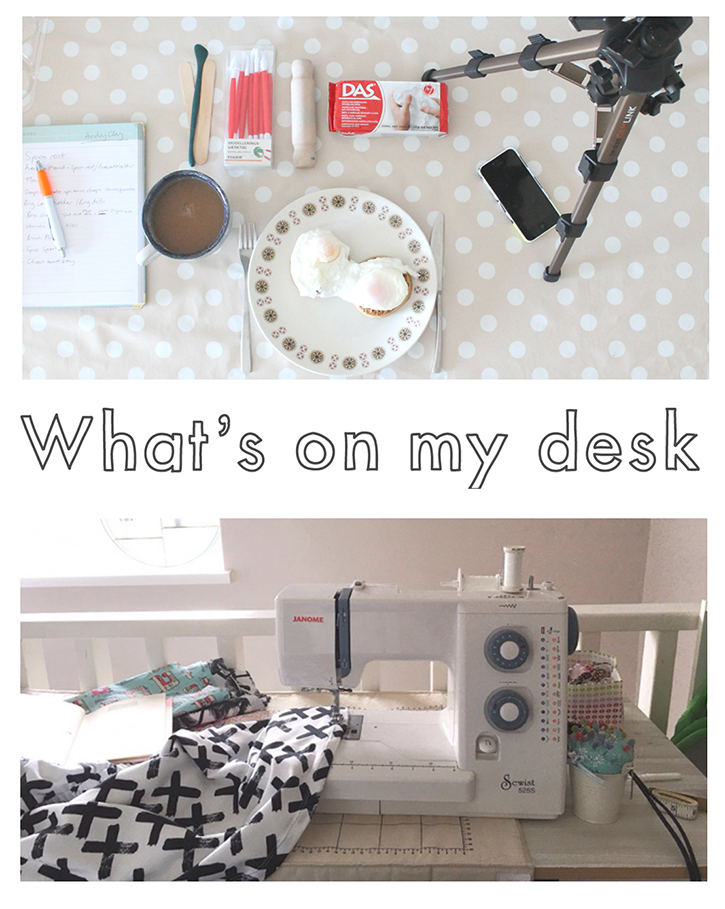
Another look at our desks this month and a little behind the scenes action. So, lets take a look at what's been on our desks this month.
H - I thought I would do a little behind the scenes shot for this month including some air dry clay that I have been enjoying using. Sometimes I find it easier to have everything set up for blog posts the night before and so I can just get straight on shooting in the morning of the weekend. Its about getting all the equipment out and making sure camera battery is charged and tripod and notebook are by my side. Sometimes I find it easier to write a step by step first with a shot list and other times its just for writing notes or ideas down while I go. Just before I got started with this little lot it was a chance to have my favourite weekend breakfast of poached eggs on crumpets and a big old brew to keep me going.
Sammy - My desk at the moment is my sewing desk, I have been sewing up a storm on my little Janome. The black and white fabric is a dress for myself that I have had cut out for ages and have finally got around to finishing off this last weekend. It is a jersey fabric from our friend Maude and the pattern is the Colette Myrtle. I am so happy with how it turned out, it is my new favourite dress! As well as goodies for myself, I have been sewing up samples for Sew Crafty and some tutorials for later this month.
What's been on your desk this month, any new ideas and fun projects? Let us know in the comments, as we all like to be a bit nosey!
H,xxx

Bloglovin / Twitter / Facebook / Pinterest / Google+ / Instagram
Make it: T-shirt quilt - Recycle Devon

We know we are not alone in our hoarding tendencies;
we all have a stack of clothes that we can’t bear to part with, but know we will
never wear again; for me it is a bunch of fun logo t-shirts I used to wear when
I worked in my local pub. I had a uniform of black combats, turquoise hair
extensions and cute t-shirts, don’t judge me it was like 2002! I didn't keep
all of them but I have kept a hold of my favourites, the ones that carry the best
memories. They have been in a box in the loft for ages so when we were
approached by the lovely people at Recycle Devon about an
up-cycling post I knew exactly what I wanted to do. This
t-shirt quilt gives you the opportunity to make use of those old clothes whilst
keeping a hold of the memories, which is a winning combination for me!

You will need:
At least nine old t-shirts, an old throw or
fabric to use as backing, fabric scissors, needle and thread, pins, embroidery
thread and a sewing machine (optional)

Step 1. Use the t-shirt with the largest
logo and cut a square around it.
Step 2. Use that as a template to cut the
other t-shirts to the same size.
Step 3. Once you have cut all the t-shirts
to size lay them out on the floor and arrange them in a display that you like,
balancing the colours and logos until you are happy with it.
Step 4. Take a photo on your phone to
remind you how you laid it out then place the top left and top center t-shirts
right sides together.
Step 5. Pin down the edge of the two
squares.
Step 6. Sew with a slight zig zag stitch along
the edge you have pinned about 1cm in from the raw edge.

Step 7. Open out the pieces
Step 8. Then iron the seam flat then join
the next square to the two you have already sewn together.
Step 9. Move on to the next row joining the
first two squares then the third square in to strips. Once you have all your
strips ready you can place them right sides together matching up the seams.
Step 10. Pin the strips together and sew
all the way along the edge. Then unfold and pin the next strip in place and
sew.
Step 11. Unfold and you should have the
front of your quilt.
Step 12. With right sides facing pin the
front of your quilt to the throw or your backing fabric of choice then pin and
sew around all four edges, leaving a small gap in one edge so you can turn it
through.

Step 13. Trim away any excess seams and the
corners to make the edges less bulky then turn it right side out by pulling it
through the gap you left open in the edge.
Step 14. Hand stitch the gap close with
some neat hand sewing.
Step 15. To stop the layers sliding around
take a length of embroidery thread and at the corners of the squares stitch the
thread through the fabric.
Step 16. Tie the length of thread in a
double knot and trim the ends to about a centimeter long.

And there you have it, the perfect memento
to snuggle under and read a good book. I am actually going to keep mine in my
husband’s car to snuggle under on our road trips. We want to know what you have
in your home that you can’t bear to part with. Give a thought as to how you
could re-purpose it and make it in to something you can love all over again.
Sammy and H xxx
Bloglovin / Twitter / Facebook / Pinterest / Google+ / Instagram
Simply Sewing and Sew Crafty 'Quick Gifts to Sew'

Quick Gifts to Sew is a booklet that comes FREE with issue 10 of Simply Sewing magazine and if you like our sewing tutorials you will LOVE this! It is packed with 20 tutorials for things to sew with your fat quarter stash. I designed the projects with a mix of easy fun ways to practice your sewing skills. I also wanted to include a good mix of techniques that can be used over and over again. There is a nice selection of projects with hopefully something for everyone on your Christmas gift list and beyond! The best thing is that nearly everything you need for all the projects are available from my shop Sew Crafty!

This project is one of the best things I have ever had the opportunity to create. I will never get used to seeing my tutorials in print, let alone the feeling of walking in to the newsagent and seeing this on the shelf, overwhelming and truly awesome! It was a real pleasure to collaborate with the guys over at Simply Sewing on this beautiful booklet.
I really hope that, if you get hold of a copy, you enjoy the projects as much as I enjoyed creating them. Don't forget that there is also a brilliant copy of Simply Sewing magazine full of projects to enjoy too, I adore Portia's gorgeous cape seen on the front cover! An autumn essential!
I would love it, if you don't already, to follow @SewCraftyShop and @SimplySewingMag over on Instagram, Oh and while your there make sure you are following @liveit.loveit.makeit because we will be live posting from Renegade Craft Fair this Sunday.
Have a lovely weekend
Sammy xxx
Bloglovin / Twitter / Facebook / Pinterest / Google+ / Instagram
Our Favourite Fabric Shops

This post has been a long time coming! This month was the month that I finally sat down and compiled our list of places we buy the thing we love more than anything else...fabric. You know that H and I both have a love for fabric, print and colour so it is only fair that we share our favourite places to go, to top up our stashes. We would love to know your favourites too, leave them in the comments below...
Makers Month: The Refashioners 2015

It's not often I remember how or when I found a blog, but in the case of Portia Lawrie's blog Makery.uk I remember specifically. It was September 2013 and was at work searching for good examples of customising to use for a window display for Sew Crafty. I came across Portia's pashmina/t-shirt re-fashion and I knew then that it would be a blog I was going to have to keep an eye on!
This year saw her take a monthly column in Simply Sewing magazine, build her very own sewing shed and launch the third season of The Refashioners. The series designed to bring the sewing community together in an online group project like no other. We had a little chat with the lovely Portia and she filled us in on everything you need to know about it.

Hey Portia, for those who are new to it, tell us a little about the story behind the re-fashioners?
Hey Portia, for those who are new to it, tell us a little about the story behind the re-fashioners?
The first series launched in 2011 with 6
participants in total and running over a week only. Participants were sent a
variety of secret garments by me; with the challenge to turn them from
"Meh" to amazing and share the results and the "how to" in
the hope that it would inspire others to get refashioning...I wanted to raise
the profile of refashioning. Shout about it's ecologicial and economical
credentials and show just how creative it can be and encourage people to look
at the "fabric" they have at their fingertips. It's all just fabric
after all! Fast forward to 2013 and the second series. This time doubled
in size and running over a fortnight as opposed to a week with eleven
participants. Again, I sourced all garments and the participants had NO
idea on what they were getting. (Evil laugh!)
The aim this year is to make this series bigger
and more far reaching than ever before. To get as much of the sewing community
refashioning in August/Sept and beyond, as we can. So far it looks like we're
achieving that! With 20 awesome blogger inspiration posts that ran throughout the whole
of August; now the community challenge is gathering pace too. Looks like large swathes
of the sewing community have taken up the call to "get shirty" with
us!

How was it approaching all the amazing people who were involved this year?
I'm always nervous when I approach the bloggers and stitchers on my wishlist for the series. They're usually on there because I admire them for some reason. When you admire someone and you ask them to join you in something, you really really really want them to say yes. But of course they have the option to say no too!! Which means a potentially gutted Portia, lol! Thankfully the majority of those that I approached said a resounding yes; and BOY did they not disappoint this year! I always feel incredibly privileged to host such talent in my little home on the web. Still pinching myself!

It must have been fun watching the blogger entries roll in? Was it intimidating to then have to post your own re-fashion?
Ha ha! You are NOT kidding! It's kinda fitting for me, as the "instigator" to close off the series I think. But as the series unfolds (I would squeal with delight every time I saw the next blog post roll in to my inbox!) and the standard of pure genius becomes apparent...well! I mean, really, when you're the one that threw down the challenge in the first place; you have to come up to scratch yourself, right!! What was really interesting though, was how many of my fellow participants also confessed to feeling nervous themselves. The blogger part of the series is in no way a competition. Each participant has their own style; their own way of working; their own uniqueness. That's the point. But when you see who you're playing alongside, there's an understandable temptation to "up your game". I think most of us felt that to be honest. But from a place of "not wanting to let the side down" rather than trying to better anyone else. I was no exception to that feeling of course. I'm not "the best" at refashioning just because I came up with The Refashioners. I just refashion in a way that suits my taste and my ability. I just made sure my refashion was done and in the bag before I saw what everyone else was doing, lol! If I'd have seen what everyone else was doing first I may have been influenced, intimidated or otherwise distracted. And I'm really pleased with my little kimono idea! I think it holds it's own ;)

Where did the idea for opening out to the public come from?
Really it's something I should have done before I guess. But I was still streamlining the whole concept and initially I didn't know if people would even respond to the idea or be interested in taking part. Back then refashioning was very much the poorer cousin of conventional dressmaking. After the second series the response from my readers was amazing and there seemed to be an increased appetite for refashioning. When I announced this years series, right off the bat I had people asking if they could join in and how they could take part too. Well, what could I do except put together a massive prize package and say....go on then...show us what you can do! Have you seen some of the entries coming in on IG and Pinterest??! Wow!

Are there any of the re-fashions that you are thinking of re-creating for yourself?
Gosh, they're all so awesome! But if you're asking in terms of what might actually suit me, anyone that knows me knows I'm a flan of simple lines and simple construction. So a version of Ute's simple white shirt, that kicked off the series, is in my future for sure. I like Wendy's interchangeable denim dresses and might apply the collar swapping concept to some silk shirts and colour block them. Erin's wrap top has me wondering if it's a style I can carry off. So that may appear at some point in a slightly different interpretation. I will also be making another shirt kimono! I genuinely like the concept. The one I made is the first incarnation of the idea and I'd like to try it again with a few minor mods. So I'm on the hunt for shirts again, ha ha!

What has it been like working with Simply Sewing Magazine? Do you think working with such a new magazine has helped raise the profile of re-fashioning? ( do you have a photo of one of the things you have done for Simply Sewing?)
I've been so lucky with Simply Sewing. They are very easy to work with and I've really enjoyed being part of the magazine right from issue one. I was so chuffed when they first contacted me to be a part of it! Even in this increasingly digital and virtual world, print adds a specific credibility to a venture. So I'm incredibly grateful to the team at Simply Sewing for throwing their support behind The Refashioners series. I think the profile of refashioning has been growing slowly over the last few years and I sense it's gathering momentum now. Long may that continue!

Do you have favourite refashion from your archive? ( ie one that you have made) can you include a photo?
My favourite is usually my most recent. But aside from that the refashion above that I did for Simply Sewing (image below) is one of my faves. In terms of the one I wear the most, it's my banded tee (image above). It's just so comfy; I reach for it as soon as it's out of the laundry again. I'm a total comfort dresser!

Who is your favourite Instagrammer?
There's too many!!! IG has become my preferred hangout in terms of social media. I don't know why it took me so long to discover it. Blog posts take time and planning to put together and the subject matter kinda needs to warrant a blog post in the first place! IG is great for sharing snippets of ideas, thoughts etc and seeing what everyone else is up to as well! I've found myself having conversations with people from all over the world, in real time (sometimes silly o'clock my time!) So cool! It's like a micro blog, twitter and pinterest all rolled into one. Awesome!

Thanks Portia!
We have been so excited to see the growth of this series and we have loved discovering lots of new sewers to follow too. Customising and 'refashioning' is a big love of both H and myself. We are looking forward to seeing all the entries for the public competition #therefashioners2015 . Totally do Not envy the job of deciding that one!
If you want to join in the fun and be in with a chance of winning the frankly A-mazing prize package worth over £700! Including a Sew Crafty Essentials Sewing Kit and a Sewing Journal head over to Portia's blog to find the details.
Sammy and H
Bloglovin / Twitter / Facebook / Pinterest / Google+ / Instagram
Makers Month: How to Size Up a Paper Pattern

Being a plus size most of my life, means that most of the sewing I do involves scaling up patterns. Today as we are in Makers Month mode I thought I would share how I do that with one of the patterns I have done this with recently, The Bettine dress from Tilly and the Buttons. This is a great pattern to practice sizing-up on as it is reasonably straight forward to sew and the pattern pieces are simple.

I use a sewing curve, also called a French curve or a pattern master depending on who you talk to about it. It has two straight sides at a right angle and a steep then sloping curve along the other. Mine has lots of helpful measurements and guidelines on it which help with measuring and creating your own curves for pattern making from scratch. I am lazy and generally prefer to alter an existing pattern to making my own from scratch.

Most paper patterns have multi size options printed on the pattern sheets. you can use these to scale the measurements that you will need to use to size up, you will also need dressmakers tracing paper or you can use greaseproof baking paper. I always iron out the original pattern paper and my tracing paper before I start as both have usually been folded in a packet for some time. Take care not to scorch the paper, I usually set it on a wool setting/ two dots. My last tip before we start is to tape down your pattern and tracing paper with masking or washi tape so the layers don't move about until you move them.

Start by taking a look a your pattern pieces, some lines won't move but will need extending, some will need moving and curves will need shifting. Curves (in general) should not need to be altered, you can see that the curves don't change shape they just move, it will be the lines they are connected to that will be moving therefore the curves can just be traced into their new position.
Your pattern should be taped to your table and the tracing paper placed over the top.
Photo 1. Trace all the lines that are not moving, in the case of the Bettine it is the centre fold and the waist, but extend the lines past the edges.
Photo 2. Mark the end of the lines that need moving, for instance the armpit line where the curve starts.
Photo 3. Peel back the tracing paper and measure the difference between the biggest and the next size down. This gives you the measurement for where the next size up line should be.
Photo 4. Pop the tracing layer back in place and use the measurement to add as many sizes as need be to your pattern. I have added 3 sizes to mine by moving the line over three times the measurement that I took.
Photo 5. Draw your new line up to meet the marking you made for the end of the line, where you new curve will start.
Photo 6. Next is the line on the other side of that curve, the bottom of the sleeve. The position of this is affected in two directions, the line moves up and across.

Photo 7. You can see here I have added the measurement for one size at a time until reached the size I wanted, I find it easier with those fiddly bits to mark every size increment.
Photo 8. Again, you want to measure the length of the straight line to where the curve starts.
Photo 9. Mark clearly where the curve begins. You then want to un-stick your top sheet and slide it over until the curve on the pattern underneath is in line with the markings you have made.
Photo 10. Then you can trace the curve exactly in place.
Photo 11. Some lines will be easier to scale, the top edge of the sleeve for instance can be sized up following the diagonal line created by the sizes below.
Photo 12. Again using the measurements from the sizes below you can add as many sizes as you might need to make your pattern fit your needs.

If you are also looking to lengthen or shorten your paper pattern, the pattern itself may have markings on it where you can do so. Tilly's helpfully do, so all you would have to do here is measure how much longer you want your finished garment to be and add in a section by allowing for that in your traced pieces. If you forget to add it whilst you are tracing, you can always go in and add in a section by cutting and taping an extra piece in place of by folding the pattern at that point.
This process is the easiest, most accurate way to size up or down that I have found but it is lengthy to explain. I do hope that my explanation is clear enough to follow and use for your own pattern sizing experiments. If you are unsure check out this article from Craftsy.com for another style of up-sizing.
If you have any questions, feel free to ask in the comments and I will do my best to answer them. If you are interested in Tilly's patterns we now stock the full range of printed patterns at Sew Crafty Online. Tilly has a great post on her blog about adding a seam allowance if the pattern you are using doesn't have one (all Tilly patterns have the allowance included) if that is something you are interested in.
I hope that might help any of you that are above or below standard pattern sizing but desire a handmade wardrobe.
Sammy xxx
Bloglovin / Twitter / Facebook / Pinterest / Google+ / Instagram
Sew Crafty Sewing Journal

You may or may not have noticed that H has been taking the reins this month, she has been picking up my slack over here whilst I have been dealing with some exciting things over at Sew Crafty. Today I can exclusively reveal Sew Crafty's first ever product release, on September 1st we are launching the Sew Crafty Sewing Journal.

To give you a little back story, My Mum has always kept lists and notes about her sewing and crafty makes. A few years ago when we started this blog I started doing a similar thing to keep track of all the stuff I was making for the blog and as gifts for friends. Earlier this year Mum and I were having a chat about what products we wanted to create that would also be useful in the sewing community. The answer was right there in front of us as we sat listing and sketching out ideas, a sewing journal.

After months of designing and making prototypes, the real thing is actually here and we are so excited to share them with you. Let's start at the beginning, there are three different covers to choose from, the graphic spot and dot cover where the little crosses are actually scissors, the watercolour peony and succulent cover which reminds me of a beautiful print fabric and lastly our photographic cover which features one of my favourite images of our little sequin pegs.

The inside pages is where we think our journal stands apart. We have designed pre-printed pages filled with prompts to help you record your sewing projects. Although if you are more of a crafter the journal still works as it is versatile enough to use for non sewing projects too!

In-between each set of project pages there are free sketching 'Ideas' and 'Notes' pages with plenty of space to plan your next projects. The journals are A5 which we think is the perfect size to pop in your bag for making notes on the go or taking with you to pick up supplies from the fabric store.

We wanted to make the journal something that you can make your own and use in a way that suits you, at the same time helping you to remember those little things that sometimes we forget. There is space to record the pattern you may have used as well as notes on what went right, what went wrong and the thing I always forget, where I bought my supplies! You can easily jazz up the inside with swatches, stickers and washi tape or leave it plain for a more minimal look


Sammy xxx
Bloglovin / Twitter / Facebook / Pinterest / Google+ / Instagram
Make it: Fabric Storage Bin with Zazzle

If you saw our post on Wednesday about designing fabric with the lovely guys at Zazzle you will know haw much we are loving the site, so today I am showing you what I made with the fabric I designed. When I saw that Zazzle.co.uk offered a heavier weight twill fabric in their 'design your own fabric' range I knew exactly what I wanted to make. I had my design printed on the heavier weight fabric so I could have a go at making some cute fabric storage bins.
To make your own fabric storage bins you will need: Medium to heavy weight cotton fabric, felt, cotton to line your bin, thread, scissors and a sewing machine.
As I always say you can of course sew this project by hand if you don't have a machine.

Step 1. Cut out a 20cm square of all your fabrics to use as your base, then cut an 80cm by 25cm piece for the strip that will make the sides. Place the felt at the bottom, the lining next then the main fabric on top and sew around the edges leaving a small gap to turn it right side out.
Step 2. Do this for the base and the side strip, sewing up the gap that you used to turn it through.
Step 3. With right sides together sew the two short edges together with a large zigzag stitch.
Step 4-5-6. Open out your tube that will be the sides of the bin and position the back seam to the back of the bin, using quilting clips attach the bottom of the bin to the sides.
Step 7. Stitch all the way around the base removing the clips as you go with that large zigzag stitch as before.
Step 8. Turn the whole bin right side out and turn down the lip to create a more stable top.

And there you have it, a cute little storage bin for sewing supplies, stationery or well whatever you like really. I am using mine on my sewing table as a handy catch all for my fabric scraps, so much more glam than the plastic bag I was using before!
Check back to see what H has made with her fabric in the next few weeks. Don't forget to share your photos if you have a go at making some of these with #livelovemake we would love to see your versions and what you use them for!
Have a lovely crafty weekend
Sammy xxx
Bloglovin / Twitter / Facebook / Pinterest / Google+ / Instagram
Subscribe to:
Posts (Atom)