

Showing posts with label shoes. Show all posts
Showing posts with label shoes. Show all posts
Who's Your Solemate? with Wynsors Shoes
Make it: Neon Tassel Sandals


Start by making your tassels, take your embroidery thread and wrap it around two fingers about 10-12 times leaving a small gap between your fingers. Gently remove the coil of thread from you fingers. Take a small length of gold thread and loop it through the coil and tie a secure knot. Take a second length of thread and tie it around the outside of the coil pulling it into your tassel shape. Once you have tied that securely you can cut the loops at the bottom of your tassel.

Trim off the ends of the tassel until it looks even and is all the same length. Repeat these steps until you have made enough tassels for both your sandals. Take your tweezers and poke them through the strap of the sandal and pull one length of the tassel tie back through the strap. Secure it in place with a few knots. Turn over the strap and trim away any excess ends, you could add a touch of glue to the knots for security too.


Sammy xxx
Live, Love, Make, Like, Share, Follow, Tweet, Pin, Add, Enjoy.
Bloglovin / Twitter / Facebook / Pinterest / Google+
Make it. Shoe Clips Trio


The Bow clip. These are really fun and easy to make, and you can use almost any fabric you like.


I started by measuring the fabric against the shoe I want them for, I made my square twice as deep and twice as wide as I want my finished bow to be, about 6 inches square. I folded the fabric in half and stitched a small hem at the open edge. Take the fabric tube and move the seam to the centre and flatten it before stitching up one end completely. Leave a small gap in the second end to turn the fabric right side out.

Once I have turned it through, I hand-stitched the hole closed with ladder stitch. I then scrunched up the fabric and carefully tied it into a knot. Pulling firmly on both ends, a bow shape starts to appear. I fiddle with the shape until I am happy then sew the shoe clip in place.
The Heart clip. These are so cute the glittery hearts are so sweet, and surprisingly durable.


I start by making a template to check the size I want my heart to be, will fit on my shoe. I use this to draw around onto the back of my glitter fabric, then do the same on my felt, before cutting all the hearts out.

The Sparkle Clips. These beauties can be made from old bits of jewellery or buttons and they add a touch of sparkle to the most boring of shoes.


For the sparkle clips you will need: Scissors, thread, felt scraps, glue, a needle, shoe clips and some sparkly gems or buttons.
I used some old gems from a bracelet that had broken, and laid them out on the felt until I liked the shape they created. I used my strong glue to glue them onto the felt, leaving out the middle gem. I then cut the excess felt away. By leaving off the centre gem it is easier to then stitch the shoe clip in place.


Sammy xxx
We would love to see if you have a go at these. Like with all our DIY's if you do, take a quick pic and share it with us on Twitter or Instagram don't forget the hashtag #livelovemake
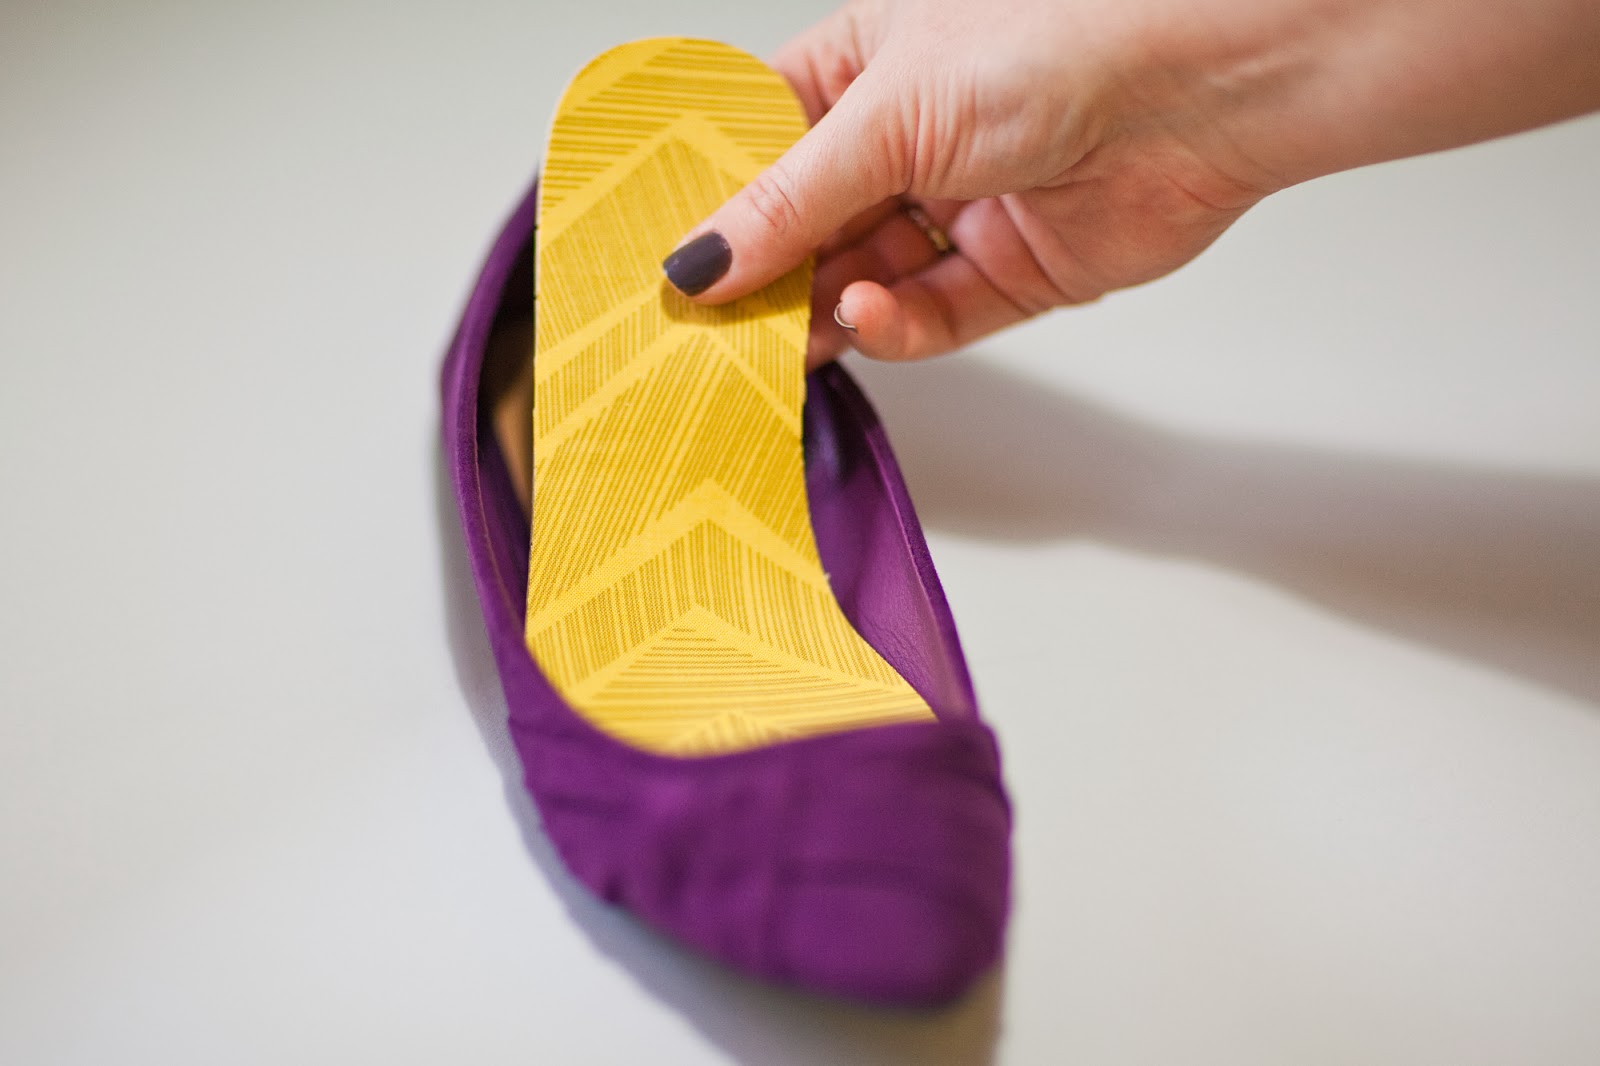
Make it. Patterned Innersoles

I have a thing about shoes, I like them to be pretty. I am that girl who buys a pair of shoes not just because they are practical but because they look pretty on my shoe rack. I am a half size, so I often end up having to buy a size up and popping in an innersole. In order to keep them pretty, a few years ago I started covering those hideous beige innersoles with pretty fabrics, so today I am going to share how I do it, so you can make all your shoes extra pretty too.
Just a note, if you don't need the addition of the padded innersole, you can just swap them out for medium weight interfacing to get all the pretty but without the padding.

You will need: pretty fabric, a pair of cheap innersoles, scissors, Bondaweb (fusable web) and an iron.
Bondaweb or fusable web is one of my 'go to' craft items. It is a web of heat activated glue with a paper backing, brilliant stuff!
I started by cutting a piece of Bondaweb and my piece of fabric big enough to fit my two innersoles on.
Then placing my bondaweb glue side down on to the back of my fabric iron the two together.
I leave it to cool for a moment whilst I cut my innersoles to size before peeling the paper backing away.


We would love to see if you have a go at these. Like with all our DIY's if you do, take a pic and share it with us on Twitter or instagram with the hashtag #livelovemake
Sammy xxx
Make it. Dalmatian Spot Trainers

Dreaming of my very own... Walk in Wardrobe

Since I was a little girl I have loved dressing up, I used to love playing in my Mum's wardrobe, trying on her clothes and walking around in her high heels before I was old enough to know how much they hurt your feet. I think every girl dreams of a wardrobe of her own and if you were a fan of Sex in the City, your dreams were realized by the size of Carrie Bradshaw's Walk-in.
One day I will have a walk in wardrobe, where everything is laid out by colour, with shelves full of shoes and bags to match... One day.
Wardrobe dreams is my Pinterest board of joy, go check it out.
What would you have on display? Shoes, bags, jewellery?
Have a lovely weekend
Sammy xxxx
Low Maintenance Halloween Outfits

Some years I go all out for Halloween and some years, like this year, I just want to be a bit more low maintenance. There are some great options from our favourite fashion brands around at the moment to make it look like you have made an effort, without going the whole hog.
Live it: Liverpool

Last weekend I found myself in Liverpool for a hen party, but I'm not going to tell you about that part as what goes on the hen party, stays on the hen party. It's not a city I have explored much I must admit, I have been there once before on a day trip and so this was a good excuse to go for a wander whilst I waited for the train I had booked on. One of the great things about booking on trains is that its cheaper if you get on a certain one, but sometimes it can mean a bit of a wait. On this occasion it turned out to be a great idea and a lovely day to explore as the weather was brilliant, hardly a cloud in the sky!
I thought I would go down to the docks as I had been to the Tate before and so thought as it is the 25th anniversary it would be worth a look. It turned out that the Mersey River Festival was on and so it was VERY busy! But that did mean I got to see a fly past, some people singing in the street and lots of boats.

Undeterred, I thought I would check out the Museum of Liverpool instead as I definitely hadn't done that, and being as I love a good museum, I thought it would tick my culture box for the weekend.
On the way I saw a lady doing some stitching and so went to check it out. She was adding French knots to a scarf as a piece of art and was asking people to have a go, well, who was I to say no. So I had a go and my work will be on this artwork forever, how cool.

Anyway, back to my wander, and I made it to the Museum of Liverpool which was busy, but as it was such a nice day I guess it wasn't as bad as it could have been, it was also free! yey.

I thought I would start from the top and walked up this amazing curved staircase, 84 steps apparently, to the third floor. Then there were different sections to go into, some about popular culture - Beatles anyone! and also boxing and football. They had these really cool coloured pods above you which had images projected inside which made the tall space feel less voluminous.

Then you could wind down the stairs and learn more about the Romans and Medieval history etc and I saw they have 3 education spaces, which for me as an education worker was fascinating! Lots of space to do different things and break-out spaces for the kids to learn. I am imagining they have more staff then my little museum though, but it is a bigger museum overall so I guess that would be fair. On the ground floor you learnt more about the industry and heritage of Liverpool, from the factories to the docks themselves - which gives this city its diverse history.

Also I managed to find out what the Superlamabananas were all about. These different coloured and designed creatures are all around Liverpool and I guess they are a similar idea to the Elephant Family which was around London a few years ago. There is a huge one in the city centre and then smaller ones dotted around. The main Superlamabana was designed by the artist Taro Chiezo but was only 4ft tall, the full-size 17ft replica was made by four local artists: Andy
Small, Julian Taylor, Tommy Reason and Ray Stokes and all the others (125 in all) were decorated by local communities/artists for the 2008 European Capital of Culture. Such a good way to get people interested in and involved in Public art and make it fun too!

It was a really interesting museum and there were pockets of space where there was works of art from local artists, which is always nice to see in a museum of this size. I also found the note above which had been pinned to a feedback wall - I love it! There was of course the obligatory cafe and shop too, so a little peruse around the shop before I headed back out into the sunshine.
I did then fully intend to make my way over to the Tate, but it was so busy, they were stopping people going over the bridge over to the area at the time I went and so I thought I would take a wander into the city centre instead as I needed to have a little look to buy some shoes for the wedding that is coming up and so I thought it might be a good place to look. As it turned out, it was and I found a little pair of flats to go with my outfit, oh yes and a cheeky pair of sandals too!

It was a brief but really interesting couple of hours to explore the city. Where would you go if you had a couple of hours to explore?
H
Love it: Neon

I am LOVING neon at the moment, for once fashion agrees with me, Yay!
It all started for me summer before last with a cut work River Island clutch bag, and ever since then my neon love has just been growing.
Here is my pick of the best of the High Street neon goodies, the Newlook necklace... I bought it in two colours... well it was buy one get one free, would have been rude not to.
Have a fab weekend
Sammy xxx
Link for the week: Simple baby shoes from Pearl Bee

A friend of mine sent me this weeks link as she has just made some of these cute little shoes for her son and I thought they were such a simple and great idea that it would be rude not to share! Pearl Bee have used wool felt to make the adorable baby shoes but I'm thinking I can use of some of my lovely fat quarters, they will look so cute.
I think 2012 must have been a lucky year or something as there were ALOT of babies that were born in my circle of friends and family! I try to make them something for each birthday and Christmas and these shoes might well be a bit small for them all now, but good to have as an idea for siblings! or even to make a really small pair for the rag doll I made my niece for Christmas, as at the moment she is barefoot!
Let me know if you make suome and send us a picture, woudl love to see them!
Make it
H
Make it: Studded boots

Super trendy seventies, heel low cut front, platform, and suede, what more can a girl ask for.....I tell you what, Studs, thats what!
I went to my trusty friend Ebay.co.uk and went looking for studs and I found some. They had to come all the way from Hong Kong but I found the perfect gold coloured screw-in studs. So when they arrived I got to work, they were so super easy to put in. Make a hole, push the screw through the hole and screw the spike on the front.

I am looking forward to wearing them this weekend in Brighton, with my new Purple skinnies for dinner out with My Hubby for our three year wedding anniversery.
Make it Punk!
Sammy xxx
Subscribe to:
Posts (Atom)