Paperchase for National Stationery Week

If you LOVE stationery, like we do, you will no doubt have noticed that this week gave us all an excuse to let our inner (and often outer) notebook geek loose as we celebrated National Stationery Week. It was way back in 1997 that H and I made our first ever trip to visit the promised land that is Paperchase Tottenham Court Road flagship store for college supplies and we have been regular worshippers ever since. So when they asked us to come along and hang out for an evening and play with a bunch of stationery goodies you can imagine what our answer was.

If you have never been to any of the larger Paperchase stores they really are worth a visit, they go all out with they merchandising and displays. We started the evening by taking a walk around the store and taking in all the beautiful new ranges and making mental shopping lists of what we were going to be purchasing before we went home!

The super chic Get Organised collection always looks amazing, now with even more added copper accents and Monochrome mixes so well with it.
The newest American Beauty range includes some of my favourite pieces from Ban.do, Kate Spade and American Crafts. Not to mention a Pinterest worthy collection of pastel storage and inspirational foiled notebooks.
Being the planner geek that I am I spent a longer than healthy time at the planner wall, serious planner girl goals right there! Summer vibes were in full force around the store with palm print, flamingos and pineapples all making us wishing the sunshine would hurry up and come to stay!
One of the many reasons I love to come to the TCR store is their selection of handmade papers, they are just amazing and the selection is huge.
Some of our favourite brands are also here including The Makery and MT washi tapes.  How gorgeous is this washi wall!
After a wander it was down to business, the business of flatlay-ing our little hearts out!! The workshop was lead by the the lovely Louise from The What Now Blog and we were given a basket full of gorgeous Paperchase stationery and got to create some amazing flatlay images.
It was honestly so much fun, you know we love a good flatlay photo so it was fun to experiment and work with the other bloggers too! We worked with the gorgeous Carol from Muff and Teacake and met up with our current YouTube girl crush Natasha Nuttal from Graphic Fantastique, and fellow bloggers Jaye Rockett and Emma Jane Palin. Here are just some of our favourite images from the evening.


Thanks so much to the team at Paperchase for having us along to the event and meeting up with other bloggers is always fun! We had such a lovely evening, and yes I ended up making some purchases before we went for dinner, it would have been wrong not too.

What have you been doing to celebrate National Stationery Week?? Link up your Instagrams, twitters and blog posts below so we can head over and take a look!

Have a lovely long weekend
Sammy and H


Bloglovin / Twitter / Facebook / Pinterest / Google+ / Instagram

Make it: Make-up Brush Pot

I am one of those people that needs a place for everything and so mugs, jugs and pots get used for everything in my house.  I like to keep everything in some kind of order and so when thinking of a project for the blog, I thought about making a pot out of air dry clay for my make-up brushes.  It could also house pens or a plant, whatever you want to really.  So, here is how I made it.

You will need: Air dry clay (I used Das, but there are loads on the market) Cutting/modelling tools (mine were from Tiger), cling film, newspaper, a mat/surface you don't mind getting dirty, rolling pin, straight edge (you could use a ruler but I decided to use some off cuts of wood to get the right length/width), a pot for water, Acrylic Paints and paint brushes (not shown, sorry).

If you haven't used air dry clay before, there are a few things to note; It does dry out and so if you have any left over make sure you wrap it up well to keep it fresh, make sure your hands don't dry out too much when using it (you can have a damp towel next to you to help), but don't make it too wet or it will become slippery and unmanageable, it should dry in a few days (you may have to turn it over to make sure it dries on all edges).
Step 1:  Cut off the amount you think you may need, you can always cut off more though.
Step 2:  Start rolling out your clay, make sure to try and roll it to the same thickness all over and think about the shape you want to make.  I wanted to make a long rectangle and so I rolled out to make that shape.
Step 3:  Using your straight edge, cut off any excess.  You can use this clay and roll it out again perhaps once more, but after that it tends to get a bit dry and cracks easily.
Step 4:  Using some water to moisten your fingers, smooth off the rough edges on all sides.
Step 5:  If you want to give your pot a texture, you can use lace/textiles or objects to roll a pattern into the clay.  Try not to push down too hard with the rolling pin, but the pattern should come through onto the clay.
Step 6:  Using another pot or glass, cut out a circle of clay from any leftovers from the side or fresh clay.
Step 7:  To add the clay together you will need to cross hatch into the clay with one of your tools, to make a rough edge on both sides of the edges you want to join.  Also add a bit of water here to give it some extra stick.  You may need to smooth out the clay together also, to ensure that both pieces of clay join.
Step 8:  I wanted to make a fold over flap design on my pot and so cut out another piece of flattened clay that was thinner to fold around the pot joining the circle.  Add the clay pieces as in Step 7, making sure it feels secure.
Step 9:  You may need to smooth off the edges again with a moistened finger to give a nicer finish.
Step 10:  The clay may take a few days to dry, depending on the weather.  Leave it in a well ventilated room and let it dry naturally, so a bit of patience here I am afraid.  Add some newspaper wrapped in cling film if you like so that the pot stays in shape as it dries.  The colour starts to get brighter when it is dry and so then you could always turn it upside down to dry the bottom of the pot aswell.

Now you have a lovely dry pot, you can paint it! yey.  I decided that I wanted to use the same colours as my room and I just love this Fluorescent Yellow and Phthalo Turquoise I had in my stash.

I decided to go a little different (as I always go for blue first on everything) and paint the blue on the inside, I did add a little white to the turquoise to make it a bit lighter.  I made sure I kept the paint quite thick so that it gave a nice bright bold finish.  Acrylic paint also gives a nice sheen to air dry clay, but you may also want to consider a varnish or using a PVA wash if you would prefer a shine to the surface.

I then painted the yellow on the outside, adding it to the top lip and bottom.  I made sure the top lip was dry first and then tipped it over to paint the bottom.

Then another wait for it to dry and voila, it was finished!  I could put my make-up brushes and a few other bits in it on my shelf!  I think it looks great in my room and is just an excuse to add more pots to my room really!  ha, ha.
The great thing about this is that you could scale it up or outwards depending on what you wanted to use it for.  I have tried to make sure all my edges are sealed, but I think if I was using this as a plant pot I might add the plant in a little plastic pot or something, just to make sure.  But for me, it works just as I like it.

Don't forget that if you try out any of our tutorials please add a picture and #livelovemake on twitter or instagram as we would love to see them.

H,xxx

Bloglovin / Twitter / Facebook / Pinterest / Google+ / Instagram

A Sunday full of food brings a week of content

You may well have heard the phrase "a Sunday well spent brings a week of content" and that was very true yesterday.  There is something really nice about eating and sharing good food on a Sunday.  It gives you that warm feeling of friendship and just puts you in a better mood, well that's what I find anyway.

It always helps when you have been food shopping and have lots of yummy food in the fridge to choose from.

Yesterday was all about Avocado and Poached egg on toast for breakfast to start the day off right and then a big old Veggie roast dinner, as I had a friend coming over who is trying to keep off meat for a bit, so I thought for ease I would go meat free too.  Got a few leftovers for my Monday lunch too, another bonus of cooking up a storm on a Sunday!

I always find I have more interest in cooking something different at the weekend as I have a bit more time I think. What's your favourite foods to make on a weekend?

H,xxx

Bloglovin / Twitter / Facebook / Pinterest / Google+ / Instagram

Sammy's Craft Room Tour on Cut Out and Keep

You know we are big fans of the craft sharing website Cut out and Keep. Well a few months ago they asked if I would share my Craft Room with their blog readers and of course I said yes.

Head over to the Cut Out and Keep blog to have a nosey around my craft room and sewing space.  It was a pleasure to chat with Cat about my favourite place in the whole world. Click the picture above to visit the tour.

I hope you all enjoy having a little look around and have a lovely weekend.

Sammy xxx

P.S I have joined Snapchat @sammytvr if you want to add me and see behind the scenes stuff from the blog and Sew Crafty too. Still getting used to it though so be gentle!


Bloglovin / Twitter / Facebook / Pinterest / Google+ / Instagram

Make it: Palm Print Shopper bag and matching clutch

I have a girls holiday booked in June and I just can't find a beach bag I like that is the right size and light enough to roll up in my suitcase. I am too impatient to wait until all the summer stuff is in the shops so as usual I turned to my sewing machine to solve my problem. We have just had this awesome palm print fabric in at Sew Crafty HQ and I knew as soon as I saw it that it was the one I had to use for this project. Then I couldn't decide if I wanted a shopper style or a clutch bag, so I made both!

Whats on our desks - April

 
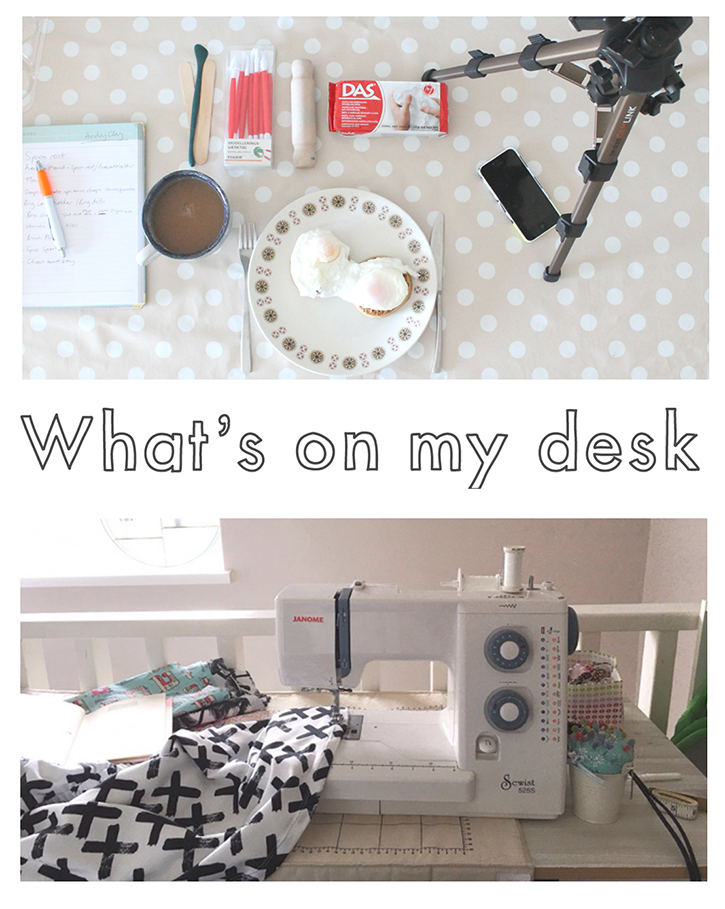
Another look at our desks this month and a little behind the scenes action.  So, lets take a look at what's been on our desks this month.

H - I thought I would do a little behind the scenes shot for this month including some air dry clay that I have been enjoying using.  Sometimes I find it easier to have everything set up for blog posts the night before and so I can just get straight on shooting in the morning of the weekend.  Its about getting all the equipment out and making sure camera battery is charged and tripod and notebook are by my side.  Sometimes I find it easier to write a step by step first with a shot list and other times its just for writing notes or ideas down while I go.  Just before I got started with this little lot it was a chance to have my favourite weekend breakfast of poached eggs on crumpets and a big old brew to keep me going.

Sammy - My desk at the moment is my sewing desk, I have been sewing up a storm on my little Janome. The black and white fabric is a dress for myself that I have had cut out for ages and have finally got around to finishing off this last weekend.  It is a jersey fabric from our friend Maude and the pattern is the Colette Myrtle. I am so happy with how it turned out, it is my new favourite dress! As well as goodies for myself, I have been sewing up samples for Sew Crafty and some tutorials for  later this month. 

What's been on your desk this month, any new ideas and fun projects?  Let us know in the comments, as we all like to be a bit nosey!

H,xxx


Bloglovin / Twitter / Facebook / Pinterest / Google+ / Instagram

Make it: Easy Phone Cover + Free Printable

One of my favourite things to DIY and decorate are phone cases. You can make really cool looking personalised cases for a fraction of the price you can buy them for in the shops. I have recently got a new phone so I have been making myself a bunch of new cases and thought it would be fun to share how I have made my own collection.

I only actually had to buy one case, a clear case, I got mine from Amazon but you can get these kinds of cases in lots of places.
First I made a template of the back of my phone to use to make all the inserts I want.
Then I print off some patterns that I have designed on Photoshop, you can download these for yourself  here >>Free Printable Cover Inserts<<  I used some fun brushes in Photoshop and some scans of some watercolour paintings from my sketch book to create these designs. I have an iPhone 6plus so these should be big enough if you print them at 100% for most phones, all you need to do is use your template and cut them down to size
I cut out the designs using my template then you can simply insert them between your phone and the case.
The best thing is that once you have the template you can use any paper or card you like to insert in the case.
I have made some out of transparent papers I got in my Messy Box, project life cards and scrapbook papers. You could even make some out of wrapping paper or fabric. I would suggest gluing lighter paper and fabrics to stiffer card to make them last longer.
If you want to make the inserts last longer you can always laminate them, but I just use them as they are.

I am so fickle and love to change up my case with my mood so for me this is the perfect solution to stop me having to buy loads of new cases. If you want to have a go at this yourself don't forget to download my designs here >>Free Printable Cover Inserts<< or raid your own stash to make your very own collection.

I am off to decide which one is my favourite!

Sammy xxx


Bloglovin / Twitter / Facebook / Pinterest / Google+ / Instagram

Sammy's Desk Drawer Tour

I have a fun little post today for anyone who is like me and likes to have a nosey into other people's craft spaces. I am sharing the contents of my Ikea Alex desk drawers. I have been meaning to do this post forever and recently had to take some photos of my craft room for an interview so I took some extra ones of my drawers to share with you. I love the system I have for my desk right now, but it has taken me a few goes at it to work out what works and where. Lets get stuck in shall we.
The first drawer has my basic sewing supplies, things I might need or things for quick hand sewing. I also keep all my pretty sewing supplies in here, so my cutest scissors, needle cases, pins and pincushion. The next drawer holds my embroidery threads and cords for jewellery along with spare needles and odd bits of aida canvas.
Next up is jewellery findings, beads and tools. I have loads of odd bits and bobs from when I used to make and sell my own jewellery, I still do the odd repair and often make stuff for myself and friends so I try and stay well stocked. A few years ago I bought a ton of these tic-tac style bead storage boxes and they are the best way for me to organise my bead collection. I stack them on their side so I can see what I have by colour. 

The bottom of that set of drawers keeps my favourite drawing supplies, spare paints and a few calligraphy inks. The top drawer in the other set has my pens, felt-tips, pencils, anything that isn't in the pots on the top of my desk is in here, close to hand.
Next down is stamps and ink pads. I have a lot more clear stamps in another box but these are all my most used wooden stamps and ink pads. Tape, glue, staples and paperclips anything sticky or holds paper together is in the next drawer. You can see I have a good stock of my favourite double sided scotch tape, I use that stuff for everything!
The last two drawers hold spare stamps and paper punches and a few odd bits and bobs like spare drawing pins, staples and old embossing powders. The last drawer holds my paints, mostly acrylics and metallics, with some tester pots and sponge daubers.

So I hope that was fun to see inside my craft desk. If you have any questions leave them in the comments below, I will happily answer them. Also let me know if you want to see a full craft room tour?

Have a lovely weekend
Sammy xxx


Bloglovin / Twitter / Facebook / Pinterest / Google+ / Instagram