

Showing posts with label Tea and Crafting. Show all posts
Showing posts with label Tea and Crafting. Show all posts
Makers Month: Our Handmade Fair Adventure
June's Instagram round-up

The end of the month is nearly here and so I thought it was about time for a little Instagram round-up. If you have been watching our Instagram recently you will know that we took a little break to Barcelona and so that features quite a bit, but who doesn't love holiday pictures! Also as usual food is a big feature, its a big feature in my life and so it would only be right to show it off.
Our Favourite Posts 2014


The Series of posts I (Sammy) wrote about how to navigate your way through a paper pattern has been one of our most viewed series this year and one of my favourite to write. Are there any other things like this that you struggle with? Let us know and we might be able to turn it into a post for you.
These biscuits are AMAZING and so simple to make, they had to make it into a top list somewhere. They would make a great Christmas Party something to take too, although be warned, they are rock hard after a day due to the golden syrup in them. Bake them in the morning and they will be great for that evening.
March - Our Liberty Adventure
In March we got to visit Liberty thanks to the lovely girls of the New Craft Society to hear about Liberty fabrics and have afternoon tea. It was a lovely experience and one we will never forget.

We loved going to see the Tea and Crafting workshop space for the first time and have been again since. In April it was to learn machine embroidery though and it was great fun, we instantly became hooked!
May - Blogtacular
We headed to London for our first blog convention. We had such an amazing time, got to meet some of our blogging idols and made some lovely new friends. Despite H and I both being rather poorly all weekend.
Well, we couldn't do this without mentioning one of our biggest moments this year. We got a project featured in Mollie Makes! And an interview too, it's still exciting and we loved being part of it, fingers crossed we can do it again soon.

For Me (Sammy) July was all about learning, I shared my favourite Blogging e-courses that I have taken in the past and learnt some new crafts on my road trip to Austria.
August - How we Wear New Look Special
We loved working with New Look and this is one of my (H) favourite How we Wear posts of the year, we look so glam! Plus we got to work with one of our favourite brands - what's not to like!
September - Make it: Cable Cosy
By far our most popular tutorial of this year and my (Sammy) favourite has to be the cable cosy we made in Makers month. With the help of Dashwood Studio's gorgeous fabric and a need to store all my cables in one place this cosy is my favourite post of the year.

Who doesn't love some spiders and bats for Halloween! Such a simple make to decorate the place or just be a fun make with the kids for the time of year.
On a personal note (Sammy) opening my shop to a whole new customer base made my November, heck it made my year! After working on it for so long it was such a relief to have the site go live. We have had such a lovely response and lots of lovely sales.
December - Gift Wrapped
The best part of Christmas for us is the giving of presents and what better way for us to enjoy it, than some amazing gift wrapping. The gift is just part of it!
Wow! what a year it has been! What have been your highlights from 2014? and what are you looking forward to next year?
H and Sammy xxx

Bloglovin / Twitter / Facebook / Pinterest / Google+ / Instagram
Who's Who: Ragged Life + Review

Firstly we had a chat with Elsie who runs Ragged Life and so that brings us onto this month's Who's who.

Who are you?
Hi everyone, I'm Elspeth Jackson, rag rug designer, maker, teacher and fabric hoarder at Ragged Life.
What do you do?
I design and make rag rug homeware, fashion and art under the "Ragged Life" brand as well as running rag rug workshops in London and Hertfordshire. "Ragged Life" is all about being rough around the edges and unique so every piece I create is handmade using materials sustainably sourced from local charity shops and I love trying our different quirky designs. Over the years I've made everything from traditional rugs, festive Christmas wreaths and bold & bright cushions to rag rug photo frames, handbags and decorative letters - I even rag rugged up a tissue box once!

How did you start?
Every year my school used to put on a recycled fashion show for arts students to take part in. My mum had been making rag rugs for as long as I could remember so one year I bit the bullet and asked her to teach me so I could make a rag rug costume. It took weeks to make and weighed a tonne but I ended up winning a prize, so all was not in vain. From there I just kept on rag rugging and here I am today!
What's Next?
With Christmas coming up I've been keeping myself busy with Rag Rug Wreath workshops and Christmas present commissions. Our large rag rug letters have been really popular so I'll be rag rugging my way through the alphabet over the next few weeks. Longer term I'd really love to get together a whole load of people to embark on a World Record Attempt for the largest rag rug in the world. I just think it would look absolutely stunning. Watch this space!
What advice would you give yourself if you could go back to the beginning?
Think big and act small. All your small actions will get you there in the end.
After our little chat we were able to get down to the fun of the workshop and start rag rugging ourselves. If you have never been down to the Tea and Crafting workshop space, we definitely recommend a visit.


After our little chat we were able to get down to the fun of the workshop and start rag rugging ourselves. If you have never been down to the Tea and Crafting workshop space, we definitely recommend a visit.
There was a group of us crafters/blogging types to learn the skill of Rag Rugging and Elsie gave us a wreath or cushion to make and so we chose one of each to get us started. Rag rugging is very simple as all you need is Hessian, spare bits of fabric and a latch hook.

First, Elsie showed us the Looped method. Using long strips of fabric, roughly around 2cm wide, you hook the tail end to the front of the hessian and push it back and loop it at the front, hence the looped method..jpg)
.jpg)
.jpg)

.jpg)
.jpg)

.jpg)

The kits include: Latch hook, Hemmed Hessian, Wooden Rag Rug Gauge, Instruction Booklet, Instructional CD with Videos and a Pen. They cost £9.99 and can be bought in her shop and will shortly be available from Sew Crafty too.
But for those who love a good workshop and are stuck for a present idea then just book yourselves on one of the workshops below:
Thursday 20th November 2014 – Rag Rug Wreath Introductory Class – 19:00-21:30 @ Tea & Crafting, Camden, London. To book please head over to Tea and Crafting
Sunday 23rd November 2014 – Rag Rug Introductory Class – 10:00-12:30 @ The Coach House, Great Wymondley, Hertfordshire, SG47ER. To book please email raggedlifedesigns@gmail.com
Saturday 6th December 2014 – Rag Rug Introductory Class – 10:00-12:30 @ The Coach House, Great Wymondley, Hertfordshire, SG47ER. To book please email raggedlifedesigns@gmail.com
Sunday 7th December 2014 – Rag Rug Masterclass – 10:00-16:00 @ The Coach House, Great Wymondley, Hertfordshire, SG47ER. To book please email raggedlifedesigns@gmail.com
Wednesday 4th Feb 2015 – Rag Rug Introductory Class – 19:00-21:30 @ Tea & Crafting, Camden, London. To book please head over to Tea and Crafting
Phew, that's alot of information! We loved our morning with Elsie and have definitely got the rag rugging bug. Such a great way to use up some fabric supplies and as it uses smaller bits, you can really use up all those tiny bits and pieces that you have left over from projects, especially for the shaggy method. Elsie recommended keeping old clothes and scouring charity shops for pattern and colours - we can imagine her place is full of fabric!
The patterns and styles that Elsie comes up with our amazing and really help to dispel that myth that rag rugging is for older people and just a bit, well, old fashioned. Go check out Elsie's work and you can even commission her too!
H
Bloglovin / Twitter / Facebook / Pinterest / Google+ / Instagram
Live it: Tea and Crafting Workshop


We all love to find a new creative space, right? and that is just what we did when we got invited to a do a workshop at Tea and Crafting in Camden. This workshop space is quite a new one and with so much on offer, it has definitely made its mark on the London Craft scene. Jane, who owns Tea and Crafting is not new to us here, H took a class with her way back in 2012 for the infamous Loom Knitting post over at Craft Central.

But now she has very much branched out on her own in the vibrant area of Camden, inviting along with her a variety of tutors to give people the choice and inspiration that a craft space needs. The workshop space is in the hub of Camden Market and is only up a flight of stairs - or lift if you prefer from the market entrance near the infamous Camden Lock Bridge.


Then, Nic explained what we would be doing, which was to applique on some fabrics onto a tea towel and then machine embroider over the applique to make it all pretty.


We had some templates sheets to look through to get an idea of what we wanted to do, you could also do your own idea, which Sammy did. We then traced/drew onto Bondaweb and chose our fabrics. I went with a rocket and rainbow theme and Sammy went for cameras. We then Ironed on our Bondaweb, cut it out and positioned onto our tea towel before the fun could start with Machine embroidery.


We then got down to the serious business of learning how to Machine Embroider. Nic showed us how to change a foot on a machine and what the foot looks like, so that you can have a little knowledge when you get addicted to it and need to go and buy a foot the very next day - just me then?


Then, down to the business of going around our image, choosing whether we were going to go once over each shape or over sketch the design. I like the over sketch design and so chose this for some of my image. Nic, then took us through some hand embroidery techniques, so that you could have a try at adding those too. I was off on a machine embroidery whirlwind though and so kept it all on the machine.


What do you think to our efforts? Sammy had done a bit of machine embroidery before, but I had not and so definitely got the bug for it.
We both really enjoyed the class, there was enough of the fun and informative to keep it really relaxed. The space is really calming and inspiring, so it could keep you coming back again and again to try something new each time.
We would recommend Tea and Crafting if you are looking for a new workshop to try. They also run crafty Hen parties and afternoon craft tea parties and so you can go with your friends too. If you do go, let us know what you think and show us what you made via Instagram or Twitter using #livelovemake.
H & Sammy
Disclaimer: We were invited to Tea and Crafting to try out one of their classes. We were not asked to give a positive review, but it just so happens that it was really easy to give one.
Make it: Loom Knitting

Last night, I went to a Loom Knitting class that Tea and Crafting held at Craft Central, in London.
So we started with Tea, which is always a great bonus and were given our loom, wool and crochet hook. The loom we were using is good to make square or rectangle shapes - good to make your granny squares quickly for a blanket! You can also get circle looms to make hats, mittens or even socks! Using the loom means that the knitting you do is thicker than usual knitting and so whatever you make is even warmer! Good for those blankets I mentioned!

Anyway, to the process. To start with we had to make a slip knot to put over one of the pegs, we were not using the whole of the length of the loom for the workshop so that we could learn all of the skills in the lesson, or we may have been there all night! Once the knot is over a peg you put the knot and the tail down the middle of the loom and the start to do a zig zag across the pegs to make 'V' shapes to the desired length, then put over the top a length of different coloured wool - all will be revealed later! It's then back to the zig zags - which is a reoccurring theme in loom knitting! Once you have 2 stitches as such on each peg, you use the crochet hook to pull the bottom stitch over the top one on both sides of the loom and then you do the zig zags again and repeat the stitches part and that as they say is as simple as that!

When you have done quite a few of these rounds the knitting will start to come out through the middle and you will see that your different coloured wool is easy to see and is holding the end of the knitting together. You can then use your crochet hook to finish off the ends by pulling the stitches through, just like crochet.
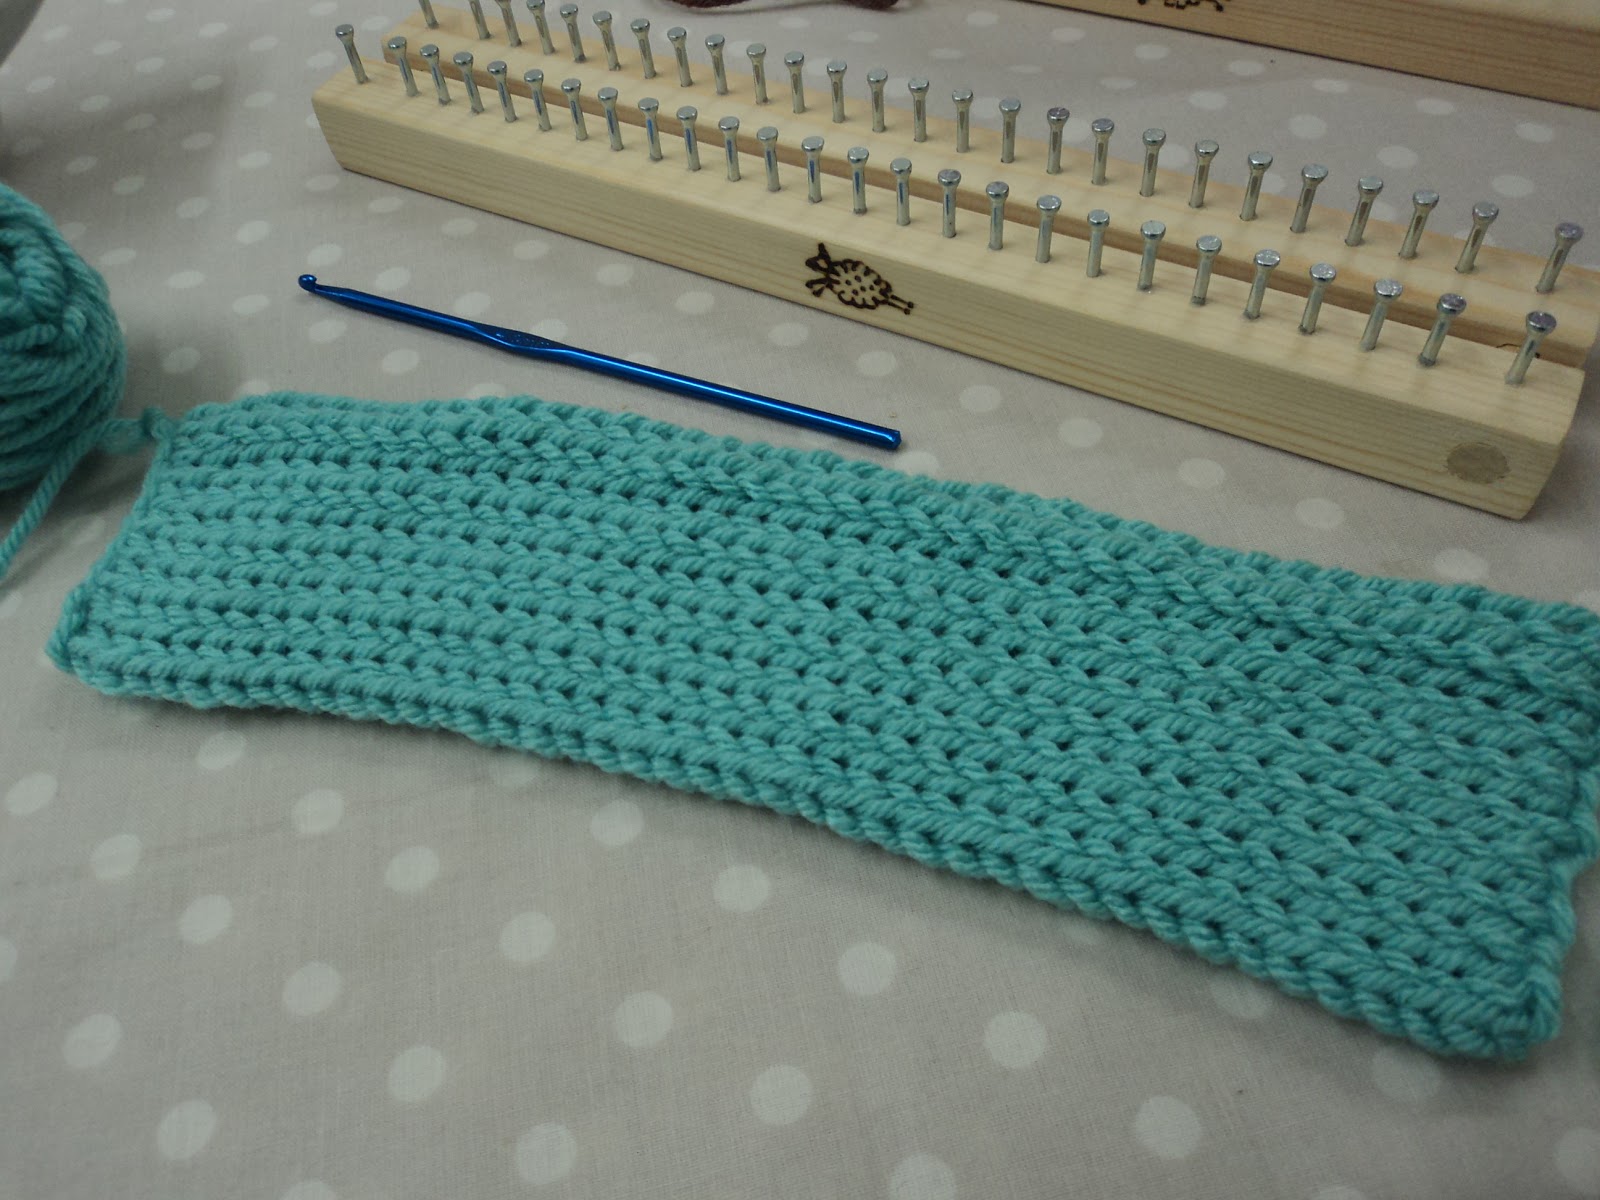
The teacher Jane was really good, very patient and making sure that everyone knew the steps. She was very friendly and chatting to us about crafts and good places to look for wool and looms. There was plenty of tea and cakes to eat to keep us going and even if you don't know anything about knitting, the loom is a great way to be able to knit and not have to worry about dropping stitches or counting!
I think I am going to try and make lots of large squares and perhaps make a baby blanket for my new niece who is coming in March. I know its quick and easy, but I think I should get on with it! Otherwise It may be her baby's blanket! ha, ha.
So thanks go out to Tea and Crafting for teaching me a new skill and giving me a new obsession! Or maybe I should not thank them!!! ha, ha, ha.
Love it
Subscribe to:
Posts (Atom)